---
title: "PHP-Only Blocks in WordPress 7.0: The Developer’s Complete Guide"
url: https://wpvibes.com/blog/php-only-blocks-wordpress/
date: 2026-08-05
modified: 2026-08-17
author: "Rashi"
description: "WordPress 7.0 lets you build real Gutenberg blocks using nothing but PHP, no React, no build pipeline, no JavaScript at all. This complete guide walks through two production-ready blocks from setup to shipping, plus the architecture, limitations, and decision points every WordPress developer should know."
categories:
- "Tutorials"
tags:
- "PHP Blocks"
- "WordPress"
image: https://wpvibes.com/wp-content/uploads/2026/08/create-gutenberg-php-blocks-wordpress-1024x538.png
word_count: 3442
---
# PHP-Only Blocks in WordPress 7.0: The Developer’s Complete Guide
For the first time in eight years, you can register real Gutenberg blocks using only PHP - no React, no npm, no Webpack, no build step. Just a plugin file, `register_block_type()`, and a new `autoRegister` flag introduced in WordPress 7.0.
This guide walks you through building a complete plugin with **two production-ready blocks** - a Notice block and a Category Display block - from setup to shipping. The complete plugin, including all CSS and helper files, is on GitHub. Everything you need to follow along is in this article; everything you need to ship is in the repository.
**A quick clarification before we start:** Server-rendered Gutenberg blocks have existed for years, but until now they always required a JavaScript layer using `ServerSideRender` to scaffold the block in the editor - even though the actual rendering happened in PHP. You still needed `block.json`, an `edit.js` file, and a build step. WordPress 7.0's `autoRegister => true` flag removes that JavaScript ceremony entirely.
We'll cover architecture and comparisons at the end. First, let's build.
## Who Is This Guide For?
WordPress developers comfortable with PHP who want to build blocks without a JavaScript build pipeline. Basic knowledge of `register_block_type()` helps but isn't required - this guide explains each step.
## What Will You Build?
- **Notice Block**: Title, description, and four skin variants (Alert, Warning, Success, Info)
- **Category Display Block**: Show post categories in Grid, List, or Compact layout, with optional images (via ACF if installed, plugin placeholder if not), post counts, and recent post lists
## Prerequisites
- **WordPress 7.0 or later**
- **Local development environment** (LocalWP, WordPress Studio, wp-env, or similar)
- **Code editor**
- **Basic PHP knowledge**
- **Optional:** Advanced Custom Fields - the Category Display block supports ACF images if available and falls back to a placeholder otherwise
## Step 1: Set Up the Plugin
The plugin contains both blocks, organized cleanly so more blocks can be added later without refactoring.
### 1.1 - File structure
Create this folder inside `wp-content/plugins/`:
wpvibes-blocks/
├── wpvibes-blocks.php
├── includes/
│ └── class-blocks-loader.php
├── blocks/
│ ├── class-notice-block.php
│ └── class-category-display-block.php
└── assets/
├── notice.css
├── category-display.css
└── images/
└── category-placeholder.png
**Why this structure?**
The main plugin file loads everything. The loader class registers all blocks in one loop. Each block lives in its own file. Each block's CSS lives in its own file too. Adding a new block later means creating one new class file, adding one line to the loader, and registering one stylesheet. This pattern scales - a plugin with 20 blocks stays maintainable; a single 5,000-line file does not.
### 1.2 - The main plugin file
Create `wpvibes-blocks.php`:
register();
}
}
}
Activate the plugin from **Plugins → Installed Plugins**. Nothing visible yet - the blocks come next.
## Step 2: Build the Notice Block
The Notice block shows a message with a title, description, and one of four skin options (Alert, Warning, Success, Info). It's the simpler of the two blocks - a good starting point for learning the API.
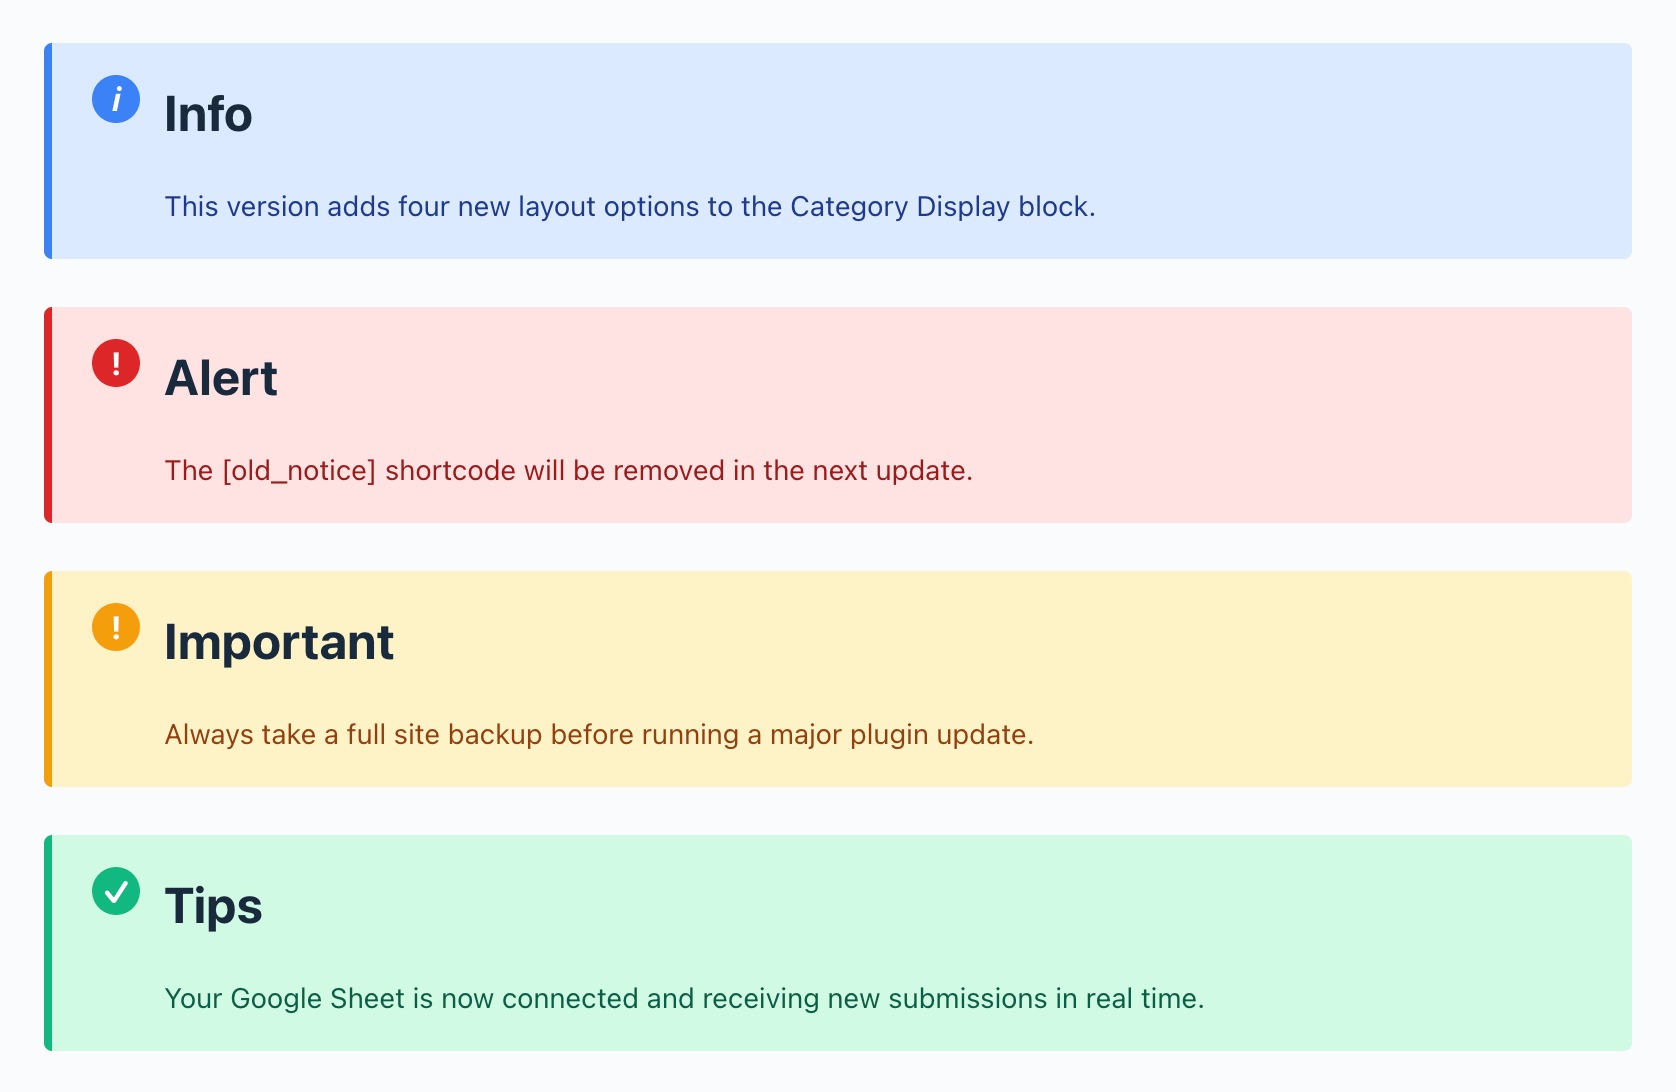All four Notice skins created with php stacked on the frontend
### 2.1 - Create the block class
Create `blocks/class-notice-block.php`:
__( 'Notice', 'wpvibes-blocks' ),
'description' => __( 'A notice or callout with 4 skins.', 'wpvibes-blocks' ),
'category' => 'text',
'icon' => 'warning',
'style' => 'wpvibes-notice',
'editor_style' => 'wpvibes-notice',
'attributes' => $this->get_attributes(),
'supports' => $this->get_supports(),
'render_callback' => array( $this, 'render' ),
)
);
}
// Attribute, supports, and render methods below
Two keys worth pointing out:
- **`style` and `editor_style`** - attach the stylesheet registered in the loader (same handle for both). WordPress loads it only when the block is used.
- **`render_callback`** - the PHP function that returns the block's HTML.
### 2.2 - Define the attributes
Add this method to the class:
public function get_attributes() {
return array(
'title' => array(
'type' => 'string',
'default' => 'Important notice',
'label' => __( 'Title', 'wpvibes-blocks' ),
),
'description' => array(
'type' => 'string',
'default' => 'Add your notice message here.',
'label' => __( 'Description', 'wpvibes-blocks' ),
),
'skin' => array(
'type' => 'string',
'enum' => array( 'Alert', 'Warning', 'Success', 'Info' ),
'default' => 'Info',
'label' => __( 'Skin', 'wpvibes-blocks' ),
),
);
}
Three attributes:
- **`title`** - a string, so WordPress auto-generates a text input in the sidebar.
- **`description`** - same, another text input.
- **`skin`** - string with `enum`, so WordPress auto-generates a dropdown with exactly those four options.
The `label` key controls what the user sees. Without it, WordPress derives a label from the attribute name.
### 2.3 - Add block supports
public function get_supports() {
return array(
'autoRegister' => true,
'color' => array( 'text' => true, 'background' => true ),
'spacing' => array( 'padding' => true, 'margin' => true ),
'border' => array( 'color' => true, 'radius' => true, 'style' => true, 'width' => true ),
);
}
Two things happen here:
- **`autoRegister => true`** - the flag that tells WordPress to register this block from PHP alone, without JavaScript scaffolding.
- **`color`, `spacing`, `border`** - turn on native design panels in the sidebar. Users get Color, Spacing, and Border controls automatically.
### 2.4 - Write the render callback
public function render( $attributes ) {
$skin_class = 'wpvibes-notice--' . strtolower( $attributes['skin'] );
$wrapper = get_block_wrapper_attributes(
array(
'class' => 'wpvibes-notice ' . $skin_class,
'role' => 'alert',
)
);
$title = ! empty( $attributes['title'] )
? '' . esc_html( $attributes['title'] ) . '
'
: '';
$description = ! empty( $attributes['description'] )
? '' . esc_html( $attributes['description'] ) . '
'
: '';
return sprintf(
'',
$wrapper,
$title,
$description
);
}
}
**Key points:**
- **`get_block_wrapper_attributes()`** returns HTML attributes carrying every design choice the user made - color, background, padding, border. Always use it.
- **`esc_html()`** on all user-provided content. Standard WordPress escaping.
- **BEM naming** - `wpvibes-notice` (base) plus `wpvibes-notice--alert` (variant). Predictable CSS.
### 2.5 - Add the CSS
.wpvibes-notice {
display: flex;
align-items: flex-start;
gap: 12px;
padding: 16px 20px;
border-left: 4px solid currentColor;
border-radius: 4px;
}
.wpvibes-notice--alert { background: #fee2e2; color: #991b1b; border-left-color: #dc2626; }
.wpvibes-notice--warning { background: #fef3c7; color: #92400e; border-left-color: #f59e0b; }
.wpvibes-notice--success { background: #d1fae5; color: #065f46; border-left-color: #10b981; }
.wpvibes-notice--info { background: #dbeafe; color: #1e3a8a; border-left-color: #3b82f6; }
### 2.6 - See it working
- Create a new page or post
- Click **+** in the block inserter and search for **Notice**
- Try each skin from the sidebar dropdown
- Adjust the native Color and Padding controls
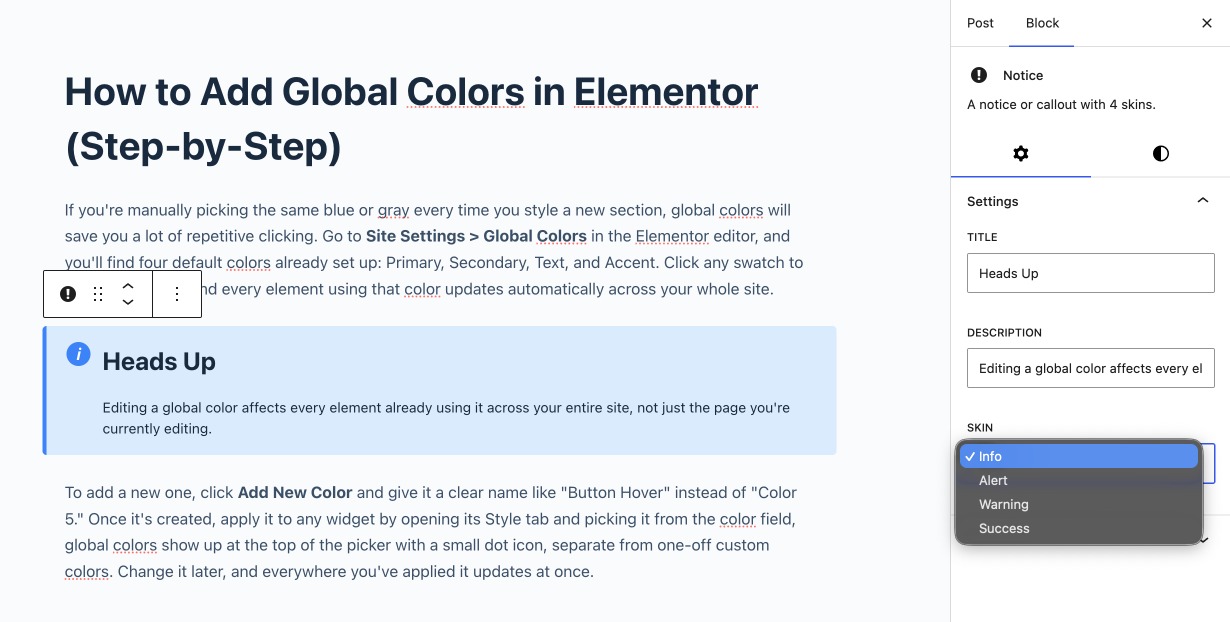*Notice block in the editor with sidebar controls visible*
The first PHP-only block is done. No JavaScript. No build step. No `block.json`.
## Step 3: Build the Category Display Block
The Category Display block shows post categories in Grid, List, or Compact layout. For each category: name, post count, an image (from ACF if installed, plugin placeholder otherwise), and a list of recent posts.
This block covers **all four supported attribute types** - string, integer, boolean, and enum - in one useful example.
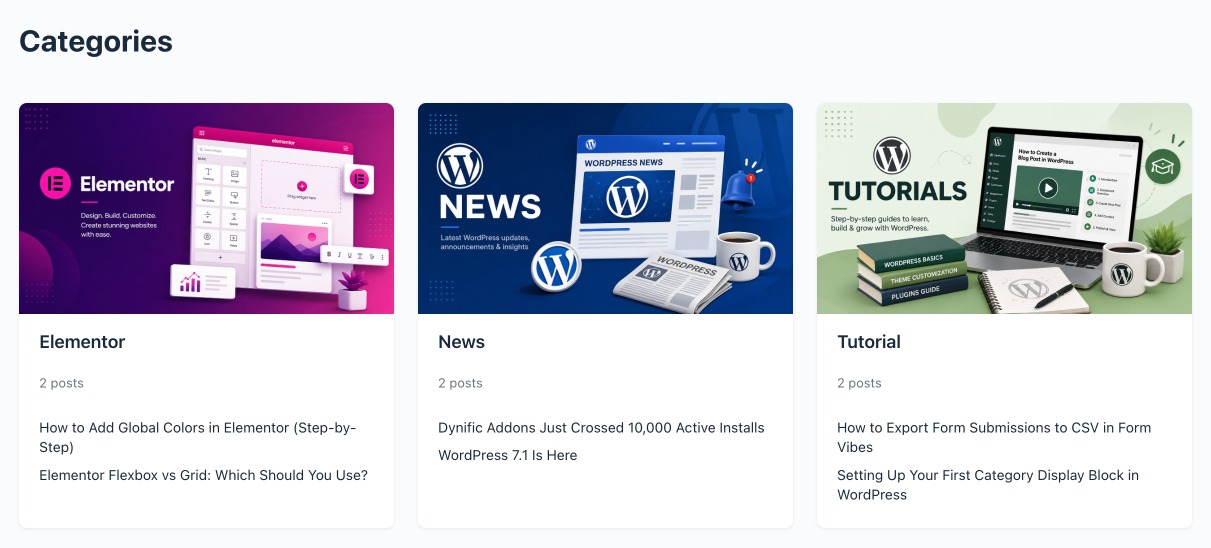*Category Display block in Grid layout on the frontend*
### 3.1 - Create the block class
Create `blocks/class-category-display-block.php`:
__( 'Category Display', 'wpvibes-blocks' ),
'description' => __( 'Display categories with post count, image, and recent posts.', 'wpvibes-blocks' ),
'category' => 'widgets',
'icon' => 'category',
'style' => 'wpvibes-category-display',
'editor_style' => 'wpvibes-category-display',
'attributes' => $this->get_attributes(),
'supports' => $this->get_supports(),
'render_callback' => array( $this, 'render' ),
)
);
}
// Attributes, supports, and render methods below
### 3.2 - Define the attributes (all 4 types)
public function get_attributes() {
return array(
// ENUM — dropdown
'layout' => array(
'type' => 'string',
'enum' => array( 'Grid', 'List', 'Compact' ),
'default' => 'Grid',
'label' => __( 'Layout', 'wpvibes-blocks' ),
),
// INTEGER — number input with min/max
'columns' => array(
'type' => 'integer',
'default' => 3,
'minimum' => 2,
'maximum' => 4,
'label' => __( 'Columns (Grid only)', 'wpvibes-blocks' ),
),
// INTEGER
'postCount' => array(
'type' => 'integer',
'default' => 5,
'minimum' => 1,
'maximum' => 20,
'label' => __( 'Posts per Category', 'wpvibes-blocks' ),
),
// STRING — text input (ACF field key)
'acfFieldKey' => array(
'type' => 'string',
'default' => 'term_featured_image',
'label' => __( 'ACF Image Field Key', 'wpvibes-blocks' ),
),
// ENUM — dropdown
'orderBy' => array(
'type' => 'string',
'enum' => array( 'Name', 'Post Count', 'Slug' ),
'default' => 'Name',
'label' => __( 'Order By', 'wpvibes-blocks' ),
),
// BOOLEAN — toggle
'showImage' => array(
'type' => 'boolean',
'default' => true,
'label' => __( 'Show Image', 'wpvibes-blocks' ),
),
// BOOLEAN
'showPostCount' => array(
'type' => 'boolean',
'default' => true,
'label' => __( 'Show Post Count', 'wpvibes-blocks' ),
),
// BOOLEAN
'showRecentPosts' => array(
'type' => 'boolean',
'default' => true,
'label' => __( 'Show Recent Posts', 'wpvibes-blocks' ),
),
// BOOLEAN
'hideEmpty' => array(
'type' => 'boolean',
'default' => true,
'label' => __( 'Hide Empty Categories', 'wpvibes-blocks' ),
),
);
}
**What each attribute type teaches:**
- **`layout` and `orderBy`** - string with `enum`. WordPress auto-generates dropdowns with exactly those choices.
- **`columns` and `postCount`** - integers with `minimum` and `maximum`. WordPress auto-generates number inputs that enforce the ranges.
- **`acfFieldKey`** - a plain string. Text input where the user types the ACF field name.
- **`showImage`, `showPostCount`, `showRecentPosts`, `hideEmpty`** - booleans. Each becomes a toggle switch in the sidebar.
That's every attribute type WordPress 7.0 auto-generates a control for.
### 3.3 - Block supports
public function get_supports() {
return array(
'autoRegister' => true,
'align' => array( 'wide', 'full' ),
'color' => array( 'text' => true, 'background' => true ),
'spacing' => array( 'padding' => true, 'margin' => true ),
'border' => array( 'color' => true, 'radius' => true, 'width' => true, 'style' => true ),
);
}
Same as the Notice block, with `align` added so users can center or full-width the block.
### 3.4 - Write the render callback
public function render( $attributes ) {
$order_by_map = array(
'Name' => 'name',
'Post Count' => 'count',
'Slug' => 'slug',
);
$categories = get_categories(
array(
'hide_empty' => ! empty( $attributes['hideEmpty'] ),
'orderby' => $order_by_map[ $attributes['orderBy'] ] ?? 'name',
'order' => 'ASC',
)
);
if ( empty( $categories ) ) {
return '' . esc_html__( 'No categories to display.', 'wpvibes-blocks' ) . '
';
}
$layout = strtolower( $attributes['layout'] );
$layout_class = 'wpvibes-category-display--' . $layout;
$columns_class = ( 'grid' === $layout )
? ' wpvibes-category-display--cols-' . absint( $attributes['columns'] )
: '';
$wrapper = get_block_wrapper_attributes(
array(
'class' => 'wpvibes-category-display ' . $layout_class . $columns_class,
)
);
$items_html = '';
foreach ( $categories as $category ) {
$items_html .= $this->render_category_item( $category, $attributes );
}
return sprintf(
'%2$s
',
$wrapper,
$items_html
);
}
What the render callback does:
- **Queries categories** using the `hideEmpty` and `orderBy` attributes
- **Handles empty state** with a friendly message
- **Builds layout classes** - `wpvibes-category-display--grid` plus `wpvibes-category-display--cols-3` for column-based grids
- **Loops through categories** and renders each via a helper method
### 3.5 - Render a single category
private function render_category_item( $category, $attributes ) {
$image_html = '';
if ( ! empty( $attributes['showImage'] ) ) {
$image_url = $this->get_category_image_url( $category, $attributes['acfFieldKey'] );
$image_html = sprintf(
'',
esc_url( $image_url ),
esc_attr( $category->name )
);
}
$count_html = '';
if ( ! empty( $attributes['showPostCount'] ) ) {
$count_html = sprintf(
'%s',
sprintf(
esc_html( _n( '%d post', '%d posts', $category->count, 'wpvibes-blocks' ) ),
(int) $category->count
)
);
}
$posts_html = '';
if ( ! empty( $attributes['showRecentPosts'] ) && $category->count > 0 ) {
$recent_posts = get_posts(
array(
'category' => $category->term_id,
'posts_per_page' => absint( $attributes['postCount'] ),
'orderby' => 'date',
'order' => 'DESC',
)
);
if ( ! empty( $recent_posts ) ) {
$posts_html .= '';
foreach ( $recent_posts as $post ) {
$posts_html .= sprintf(
'- %s
',
esc_url( get_permalink( $post ) ),
esc_html( get_the_title( $post ) )
);
}
$posts_html .= '
';
}
}
return sprintf(
'',
$image_html,
esc_url( get_category_link( $category ) ),
esc_html( $category->name ),
$count_html,
$posts_html
);
}
Each part (image, count, recent posts) is built conditionally based on the toggles. If a toggle is off, that part's HTML variable stays empty and contributes nothing to the final output.
### 3.6 - The ACF image with fallback
The Category Display block uses an ACF image if the site has ACF installed and the field is set. If not, it falls back to a placeholder from the plugin's own assets folder:
private function get_category_image_url( $category, $acf_field_key ) {
// Check if ACF is active AND a field key is provided.
if ( function_exists( 'get_field' ) && ! empty( $acf_field_key ) ) {
// ACF term meta uses 'category_' . term_id as the object ID.
$acf_image = get_field( $acf_field_key, 'category_' . $category->term_id );
if ( $acf_image ) {
// ACF image field can return an array, an ID, or a URL string
// depending on the "Return Format" setting.
if ( is_array( $acf_image ) && ! empty( $acf_image['url'] ) ) {
return $acf_image['url'];
}
if ( is_string( $acf_image ) ) {
return $acf_image;
}
if ( is_numeric( $acf_image ) ) {
$url = wp_get_attachment_image_url( $acf_image, 'medium' );
if ( $url ) {
return $url;
}
}
}
}
// Fallback: plugin's placeholder image.
return WPVIBES_BLOCKS_URL . 'assets/images/category-placeholder.png';
}
}
Three things this pattern teaches:
- **`function_exists()` before using an external plugin's function** - always. Never assume ACF (or any plugin) is active.
- **The ACF term meta prefix** - ACF stores term meta under `category_` + `term_id`. This trips up many developers.
- **Handling ACF's different return formats** - ACF image fields can return an array, an ID, or a URL, depending on the "Return Format" setting. The code should handle at least the two common ones.
### 3.7 - Add the CSS
Create `assets/category-display.css` with the base structure:
.wpvibes-category-display {
display: grid;
gap: 24px;
}
.wpvibes-category-display--grid {
grid-template-columns: repeat(3, 1fr);
}
.wpvibes-category-display--grid.wpvibes-category-display--cols-2 { grid-template-columns: repeat(2, 1fr); }
.wpvibes-category-display--grid.wpvibes-category-display--cols-4 { grid-template-columns: repeat(4, 1fr); }
.wpvibes-category-display--list { grid-template-columns: 1fr; }
.wpvibes-category-display--compact { grid-template-columns: 1fr; gap: 0; }
### 3.8 - Add a placeholder image
Place any image at `assets/images/category-placeholder.png` - an 800×450 image works well. The plugin repository includes one; a custom branded placeholder also works.
### 3.9 - See it working
- Assign a few posts to different categories
- Insert the **Category Display** block
- In the sidebar, try:
Each layout (Grid, List, Compact)
- Different column counts (2, 3, 4) while in Grid layout
- Toggling Show Image, Show Post Count, Show Recent Posts
- Changing Posts per Category
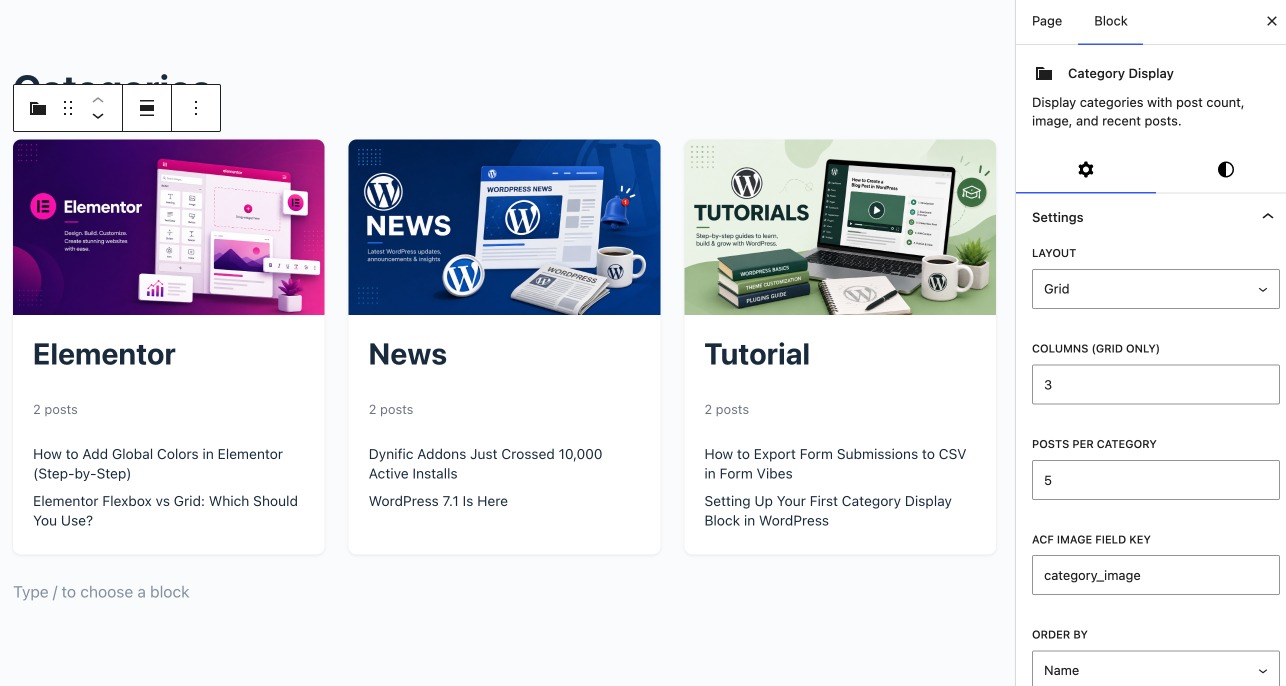Category Display block Settings to Changes Layout or Hide/Show Fields
Two production-ready PHP-only blocks - one simple, one covering the full API - done.
## Debugging Tips
When something breaks during development, enable WordPress debug logging in `wp-config.php`:
define( 'WP_DEBUG', true );
define( 'WP_DEBUG_LOG', true );
define( 'WP_DEBUG_DISPLAY', false );
Then check `wp-content/debug.log` after triggering the issue. Nine times out of ten, a PHP error during registration is the culprit - and it will be in the log with a line number.
For attribute-level debugging (checking what's being passed to the render callback), add temporary `error_log()` calls at the top of the render function:
error_log( 'Notice block attributes: ' . print_r( $attributes, true ) );
Remove these before shipping.
## Get the Full Plugin
The complete plugin - with all CSS, placeholder image, and README - is on **[GitHub](https://github.com/webtechhardik/wpvibes-blocks)**.
## How PHP-Only Blocks Work Under the Hood
Now that the plugin builds, here's what actually happens when a PHP-only block is registered and rendered.
### Before WordPress 7.0
Building a server-rendered block required these files, at minimum:
my-plugin/
├── src/block/
│ ├── block.json
│ ├── edit.js
│ └── index.js
├── package.json
└── my-plugin.php
The `edit.js` typically looked like this:
import { ServerSideRender } from "@wordpress/editor";
export default function edit( props ) {
return (
);
}
A JavaScript component whose only job was to say "please render this on the server." Then `npm install`, run a build, and hope everything worked.
### With WordPress 7.0
WordPress 7.0 adds one flag: `autoRegister => true`. When set, WordPress:
- Takes the block registration from PHP
- Adds it to a JavaScript global in the editor settings
- The editor picks it up and uses `ServerSideRender` internally for the preview
- When a user changes an attribute, the editor calls the REST API, which runs the PHP `render_callback`, and swaps in the new HTML
Zero JavaScript written. WordPress handles the ceremony.
### The runtime flow
User changes an attribute in the sidebar
↓
Editor sends REST API request
↓
WordPress runs render_callback in PHP
↓
render_callback returns HTML string
↓
Editor swaps HTML into the block preview
This is why every attribute change causes a small delay - there's always a server round-trip. That's the deliberate trade-off: no client-side complexity, but no live reactivity either.
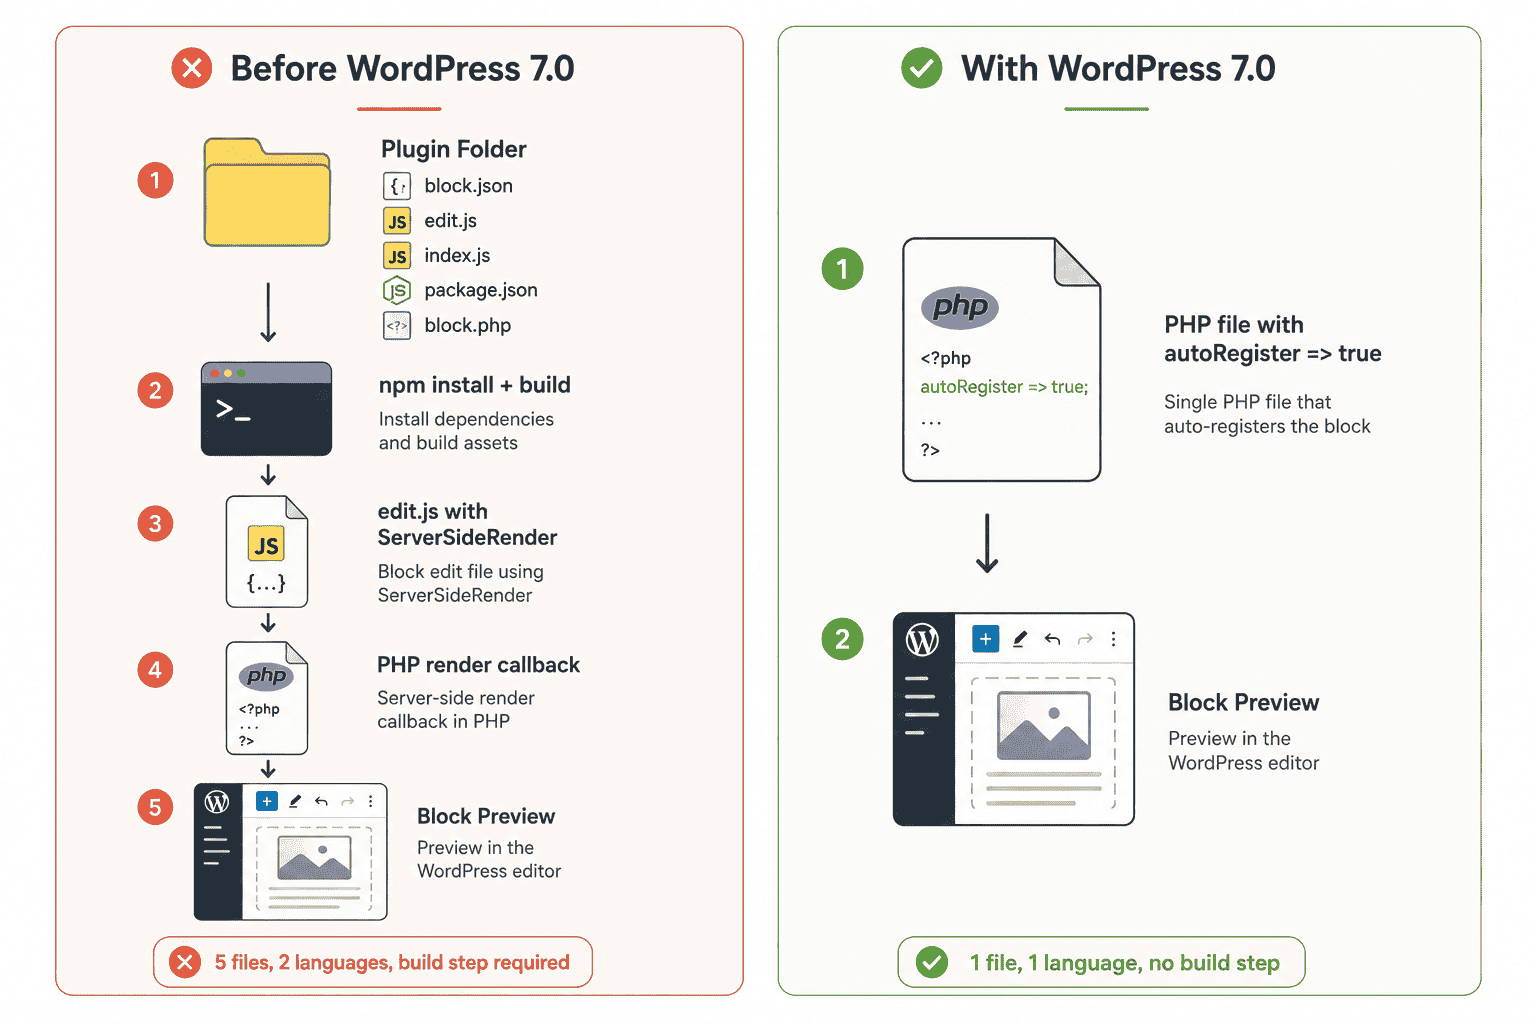WordPress 7.0 Benefits to Create PHP Block
**Auto-generated inspector controls**
WordPress inspects the `attributes` array and generates sidebar controls automatically:
| Attribute definition | Generated control |
| -------------------- | ----------------- |
| `type: 'string'` | Text input |
| `type: 'string'` + `enum: [...]` | Dropdown (SelectControl) |
| `type: 'integer'` with `minimum` / `maximum` | Number input with enforced range |
| type: 'boolean' | Toggle switch |
Controls are **not** generated for `object` and `array` types, or for attribute names that conflict with reserved block-supports names like `style`.
## When Should You Use PHP-Only Blocks?
An honest decision table:
| Use PHP-only blocks when | Use JavaScript-registered blocks when |
| ------------------------ | ------------------------------------- |
| Block is display-only (notice, category grid, author box) | Block needs InnerBlocks (nested blocks) |
| Content comes from server data (users, posts, terms, APIs) | Inline rich-text editing is required |
| Replacing a legacy shortcode | Editor experience needs live client-side reactivity |
| Avoiding a JavaScript build pipeline | Interactivity API is needed for state management |
| Simple enough that a server round-trip on each change is acceptable | Real-time visual manipulation (drag handles, instant previews) is essential |
Both approaches are first-class WordPress citizens. PHP-only blocks aren't a downgrade -they're a shortcut for a specific class of blocks that never needed JavaScript in the first place.
## What Are the Limitations of PHP-Only Blocks?
Deliberate scope decisions, not bugs. Knowing them helps pick the right approach.
| Limitation | Impact | Status |
| ---------- | ------ | ------ |
| No InnerBlocks / nested blocks | Can't build columns, accordions, sections | No timeline announced |
| Only 4 attribute types (string, integer, boolean, enum) | No media picker, rich text, date picker | DataForm being extended to PHP-only blocks in 7.1 |
| Block Bindings limited in 7.0 | Custom fields, post meta bindings need workarounds | ACF and Meta Box become native binding sources in 7.1 |
| Server round-trip on every attribute change | Preview feels less responsive than JS blocks | By design - the trade-off for zero JavaScript |
| Custom `style` attribute conflicts with supports | Must rename to `skin`, `variant`, etc. | Reserved namespace, not a bug |
## Frequently Asked Questions
### Can PHP-only blocks contain InnerBlocks?
No. PHP-only blocks cannot contain nested blocks. For layouts like columns, accordions, or sections that wrap other blocks, use the traditional JavaScript block registration path.
### Do PHP-only blocks work with the Interactivity API?
Not directly. The Interactivity API is designed for client-side state and reactivity, which PHP-only blocks don't provide. For blocks needing state (toggles, tabs, live filtering), JavaScript block registration is the correct choice.
### Which attribute types get auto-generated controls?
Four types: string (text input), string with enum (dropdown), integer with minimum/maximum (number input), and boolean (toggle). Types like object and array do not generate controls.
### Why is my custom style attribute causing errors?
WordPress reserves the `style` attribute name when block supports for color, spacing, or typography are enabled. Rename any custom attribute called `style` to something like `skin`, `variant`, or `theme`.
### Does the editor preview update in real time?
No. Each attribute change triggers a REST API call to the PHP `render_callback`, then the editor swaps in the returned HTML. There's a small delay on every change - this is the trade-off for not writing JavaScript.
### Can I use wp_enqueue_block_style() for PHP-only block CSS?
Not reliably. `wp_enqueue_block_style() `works for JavaScript-registered blocks but doesn't always fire for PHP-only blocks in the editor. Use `wp_register_style() `with the `style` and `editor_style `keys inside `register_block_type()` instead - the pattern shown in this guide.
### What happens in the editor if the render callback throws an error?
The block shows "Error loading block" in the editor preview. Check `wp-content/debug.log` for the PHP error - the line number points directly to the issue.
### Do PHP-only blocks support WordPress block themes and Full Site Editing?
Yes. PHP-only blocks work in block themes, templates, template parts, and the Site Editor. WordPress 7.1 enforces iframe mode for block themes - the examples in this guide use current APIs, so no changes are needed.
## Wrapping Up
Building the WPVibes Blocks plugin has covered:
- **`autoRegister => true`** is the entire "new API." Everything else is standard `register_block_type()`.
- **The `style` and `editor_style` keys** with `wp_register_style()` are the right way to attach CSS to a PHP-only block — cleaner and correctly loading in both editor and frontend.
- **`get_block_wrapper_attributes()`** carries all block-supports styles into the render output. Always use it.
- **Auto-generated sidebar controls** work well within their limits - string, integer, boolean, enum.
- **Server round-trip on every attribute change** is the trade-off - keep render callbacks fast.
- **One file per block** scales. Adding a new block later is one new file, one line in the loader.