Migrating your WordPress website to a new server is not difficult, but it does require some careful planning. With these easy steps, you’ll be able to move your website without any downtime!
Before you start transferring, make sure that the new server meets all of your hosting requirements and you have a backup of your website files ready to go.
You can also copy your website files from one hosting account to another if you have only a few pages and posts.
Let’s get started!
Key Takeaways: What You’ll Learn
- Understand why website migration is important.
- Learn three simple methods to migrate WordPress (manual, hosting, and plugin).
- Get pre- and post-migration checklists for a smooth transition.
- Discover migration plugins like All-in-One WP Migration, Duplicator, and more.
- Learn how to migrate WooCommerce websites without data loss safely.
What is Website Migration in WordPress?
Website migration is the process of transferring a website from one hosting server to another or moving it to a new domain.
Why Do People Migrate WordPress Websites
One of the biggest reasons people choose to migrate their site is for cheaper and more reliable hosting on another server. Plus an increase in performance! A Few other reasons for website migration are:
- Upgrade from older technology to a newer one.
- Changing hosting providers due to higher costs, control, stability, and reliability.
- Change the domain name or web address for better branding and SEO benefits.
- Complaints about downtime and slow load times.
- Server end date is approaching, and new hosting required.
- Poor performance, and need to upgrade or migrate to a new service.
- New features are offered by the new host.
- Migrating to VPS.
- Software updates incompatibilities.
- Unavailability of technical support.
- Low bandwidth or high bandwidth is required according to their website needs.
- Launching a new site or moving from staging to production.
- Moving testing sites or creating staging sites.
Pre-Migration Checklist For WordPress
Setting up a new hosting account can take a few days, but there are a few things you need to do before the transfer process starts.
- Create an account with your new hosting provider
- Make sure they support WordPress
- Find out if the new host supports the same PHP version as your current site
- Find out how many emails they provide with their hosting plan
- Check the disk space and bandwidth requirements of your website
- Check the maximum upload limit
- Check if your website is HTTPS-ready or not
- Check the SSL certificate
How to Migrate your WordPress Website?
There are many different methods that you can use to migrate your website. The way you choose depends on your needs and the level of involvement you would like to have in the migration process!
There are three methods by which you can migrate your website:
- Migrate manually
- Migrate to your new hosting
- Migrate with the plugin
Note: You should always back up your files and databases before doing anything. Learn How to backup a WordPress website.
Migrate WordPress Websites Manually
Migrating a website manually is more of a time-consuming task and will require a lot of your knowledge. We recommend using phpMyAdmin to move your database and upload your files via FTP or cPanel. Let’s get started!
- Back up your website’s content – Create a full backup of your website’s content. If you don’t know how to do that, you can read How to backup a WordPress website.
- You can download your website’s files from your server’s root folder, i.e., public_html.
- Create a backup of your database using PHPMyAdmin. You can find this service in your cPanel. Export database files from there.
- Download and install WordPress on your new server.
- Upload your files using FTP or SFTP service, or you can directly upload files to the root directory of your cPanel.
- Create a database in PHPMyAdmin and upload the database.
- Edit the wp-config.php file in the public_html folder and update Database Name, Username, Password, and host manually.
- Change your domain name service (DNS) to point to your new WordPress installation.
- Update permalinks by navigating to Settings -> Permalinks and clicking save.
- Update any external references such as links to your CDN, Social media links, etc.
Migrate WordPress Websites Using Your New Hosting
Hosting providers offer migration services. If you talk to your hosting provider, they might give you some options for migration, like Bluehost, Flywheel, HostGator, and Cloudways, which give you a free plugin to migrate your website. Or if you want your hosting providers to do the migration for you, you’ll need to pay some extra charges for this service.
In all these cases, you need to point the name servers and IP to the new server where you want to move your website.
Migrate WordPress Websites Using Plugins
Migrate with a third-party service like All-in-One WP Migration. This is a popular WordPress plugin that can be used to migrate your website between servers and hosts with some simple steps. Here’s how:
Note: Install and activate the All-in-one WP migration plugin on your staging and production (old and new) websites.
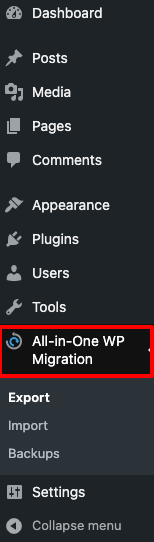
Step 1: Once you’ve installed and activated All-in-one WP migration, navigate over to the plugins tab and deactivate and delete any other WordPress plugins that might cause conflicts during the migration process.

Step 2: The All-in-One WP Migration option will be shown in the dashboard menu. You’ll find several options to set up your migration. Here is an explanation:
Step 3: Click on Export option. It allows you to select what content you would like to export from your previous WordPress setup, including posts, pages, comments, tags, categories, and custom fields. You will find it in the advanced settings option.
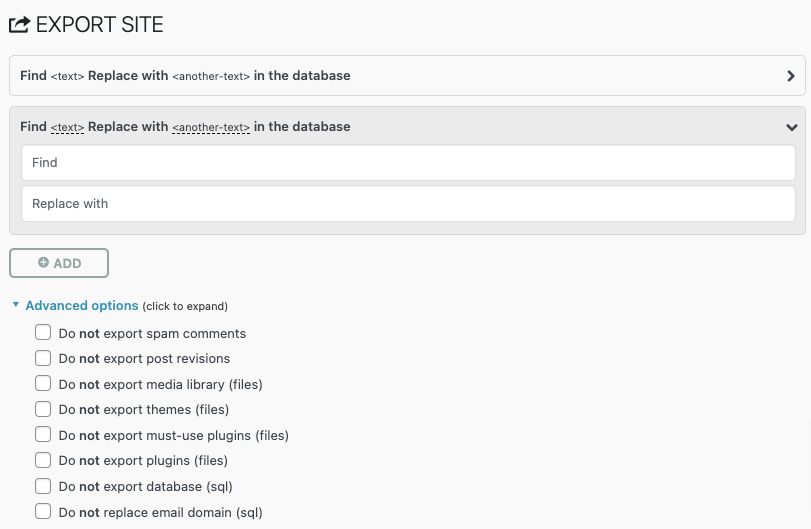
You can choose the export option from the given settings
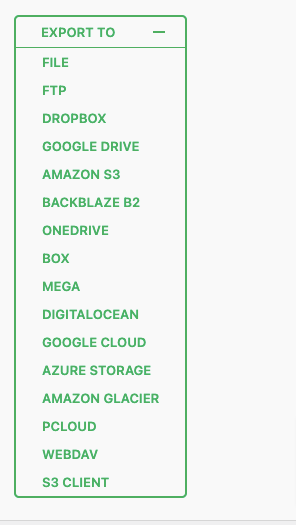
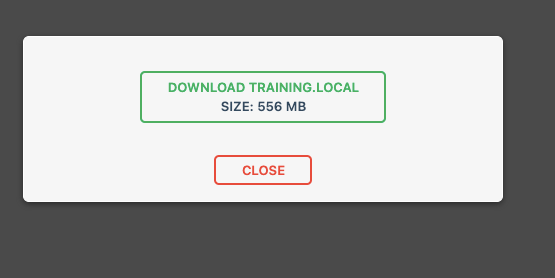
Your export process has started. Once complete, you can download the zip file.
Go to your new server, where you want to migrate. Set up a new WordPress and install the All-in-One WP Migration plugin there.
Go to the import section, click on import from the button, and select your option.
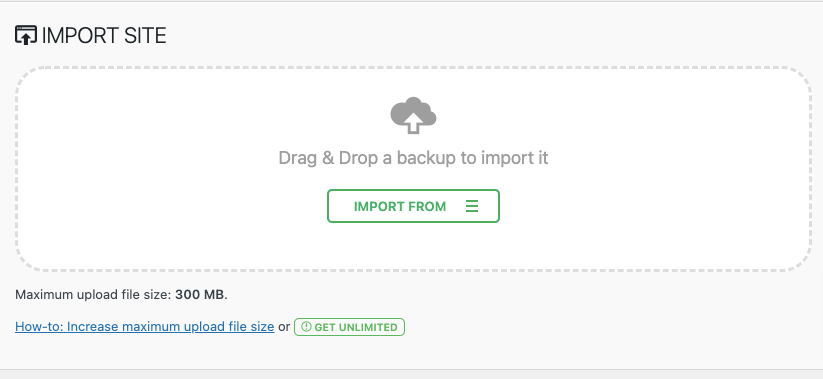
Now it will take a few minutes, and your site will be live. You can use this plugin to create a site backup, too.
That’s all! With just a few clicks of the mouse and some patience, your site will be moved to your new hosting server in no time.

Best WordPress Migration Plugins to Consider
Besides this, there are many other popular plugins you can use to migrate your WordPress website easily. If you’d like to explore more options, check out our detailed article on the best WordPress backup and migration plugins.
Which WordPress Migration Method Is Best for You?
Manual migration is ideal for people who understand the core structure of WordPress.
You need to deal with WordPress files and databases, and therefore, it’s very risky. Your little mistake can end up breaking your live website, so you should be careful and take a full backup of your website before starting the migration.
Other factors you can consider are the time it takes to complete the migration and the amount of data that needs to be migrated. If you are migrating a lot of data, then FTP or SSH File Transfer Protocol is the best option.
How to Migrate a WooCommerce Website Safely
You can do this by using a migration plugin, All-in-One WP Migration. Install the plugin on both WordPress setups (Old and new), export a backup from the old setup, and import it to the new setup. The process is the same that we have used to migrate websites using plugins (explained above).
We will not recommend migrating the WooCommerce website manually. WooCommerce websites store a ton of information, and there are too many functions on the site.
Post-Migration Checklist
A Post-migration checklist is a plan that helps us identify the things that can be done after migration. This checklist will ease the things to be done after migration.
- Check all links, broken images, and multimedia files (flash, video, audio, etc.).
- Check for 404 errors.
- Check search engine optimization.
- Crawl the website again to check the number of pages indexed by Google. And resubmit the sitemap to the Google Search Console tool.
- Check for robots.txt files in case you don’t want search engines to index certain pages. You can create a crawler_exclusion_rules.txt file for this purpose.
- Check for broken links.
- Content audit.
- Perform a link popularity check by using a backlink analysis tool like SEMrush, Ahrefs, or Moz.
- Run a website speed test to check page load time and various speed optimization tips.
- Check duplicate title tags, meta description, meta keywords, etc.
- Check for .htaccess redirects.
- Do a 301 redirect from your old domain to the new domain.
- Back up your current website, database, and files.
- Check social media profiles and add your business on various platforms.
- Ensure the website loads properly with HTTPS and without www in both cases.
- Inform your users about the website address change by email or social media.
FAQs on Migrating WordPress Websites
Is it safe to migrate a WordPress website yourself?
Yes, if you follow a step-by-step approach and take a full backup beforehand, migrating a WordPress site yourself can be completely safe.
Which plugin is best for WordPress migration?
All-in-One WP Migration, Duplicator, and WP Migrate are popular and beginner-friendly tools for site migration.
Can I use these methods for WooCommerce websites too?
Yes, but WooCommerce stores are more complex. It’s recommended to use plugin-based migration to avoid breaking dynamic data.
Do I need to back up my website before migration?
Yes, always take a full backup of your website files and database before starting the migration to avoid data loss.
What should I check after website migration?
Review your site for broken links, SEO settings, images, permalinks, and ensure HTTPS is working. A detailed post-migration checklist is essential.
Start Migrating Your WordPress Website
Migrating your WordPress website might sound technical, but with the right method and preparation, it can be smooth and stress-free. Whether you prefer to migrate manually, use your hosting provider’s help, or go with a plugin-based approach, each method offers its own benefits. By following the pre- and post-migration checklists, you reduce the risk of downtime, data loss, or SEO issues.

Leave a Reply