Do you want to know about WooCommerce Shipping Classes for your Online Store?
WooCommerce Shipping Classes allow you to categorize and customize the WooCommerce shipping settings for different products in your online store.
By assigning specific WooCommerce shipping classes, you can effectively manage and control the shipping options and costs associated with each product. It’s all about giving your customers a smooth shipping experience, whether they’re ordering bulky stuff, fragile items, or anything in between.
This guide will describe to you:
- About WooCommerce Shipping Classes
- Importance of Shipping Classes
- Creating WooCommerce Shipping Classes
- Adding Shipping Cost on Shipping Classes
- Assign Shipping Class to Single Product
- Assign Shipping Class to Multiple Products
Key Takeaways
- Understand what WooCommerce Shipping Classes are and how they help you group products for better shipping control.
- Learn why shipping classes are important for managing shipping costs fairly based on product type, size, or weight.
- Discover the steps to create a shipping classes from the WooCommerce dashboard.
- Configure custom shipping rates for each class using shipping zones and flat rate methods.
- Learn how to assign shipping classes to individual products or multiple products at once using bulk edit options.
What are Shipping Classes in WooCommerce
WooCommerce Shipping Classes are like labels you can assign to your products to control how they’re shipped. They help you set specific shipping conditions for different types of products so that you can adjust the shipping cost accordingly.
Whether you’re selling something heavy or delicate, these classes let you set specific shipping rules for each type of item. This way, you ensure a fair and accurate shipping fee for your customers, depending on what they’re buying.
Example
Let’s say you run an online store selling furniture. You have some items like chairs and small tables that are easy to ship and don’t cost much to ship. Then, you also have oversized items like sofas and dining tables that need special handling and cost more to ship. With WooCommerce Shipping Classes, you can create two classes: “Standard” for the small stuff and “Oversized” for the big stuff.
When a customer buys a chair, WooCommerce knows it’s a “Standard” item and charges a regular shipping fee. But when someone orders a sofa, WooCommerce recognizes it as an “Oversized” item and calculates the shipping cost accordingly.
What is the Importance of Adding WooCommerce Shipping Classes
Here are the importance of using WooCommerce Shipping Classes.
- Helps organize products with similar shipping needs, like heavy, bulky, or lightweight items.
- Makes it easier to set specific shipping rates for different types of products.
- Reduces manual work when calculating shipping costs for each product individually.
- Works well with shipping zones and methods to offer more accurate shipping charges.
- Helps store owners avoid overcharging or undercharging for shipping.
- Improves the customer experience by showing clear and fair shipping rates.
- Useful when using third-party shipping plugins or real-time carrier rates.
- Supports advanced shipping strategies, like free shipping for lightweight items only.
- Makes scaling the store easier by keeping shipping rules consistent and organized.
Difference between WooCommerce Shipping Classes and Shipping Rates
Here’s the difference between shipping classes and shipping rates in WooCommerce:
- Shipping Classes are used to group products based on their shipping requirements. For example, you can create classes like “Heavy Items,” “Small Packages,” or “Fragile Items.” These classes help apply specific shipping rules to similar types of products.
- Shipping Rates are the actual charges customers pay for shipping during checkout. These can be flat rates, free shipping, or calculated by weight, location, or shipping class.
How to Create WooCommerce Shipping Classes
- To create a shipping class, navigate to the WooCommerce ➝ Settings ➝ Shipping tab, then click on the Classes option. From there, click on the “Add shipping class” button.
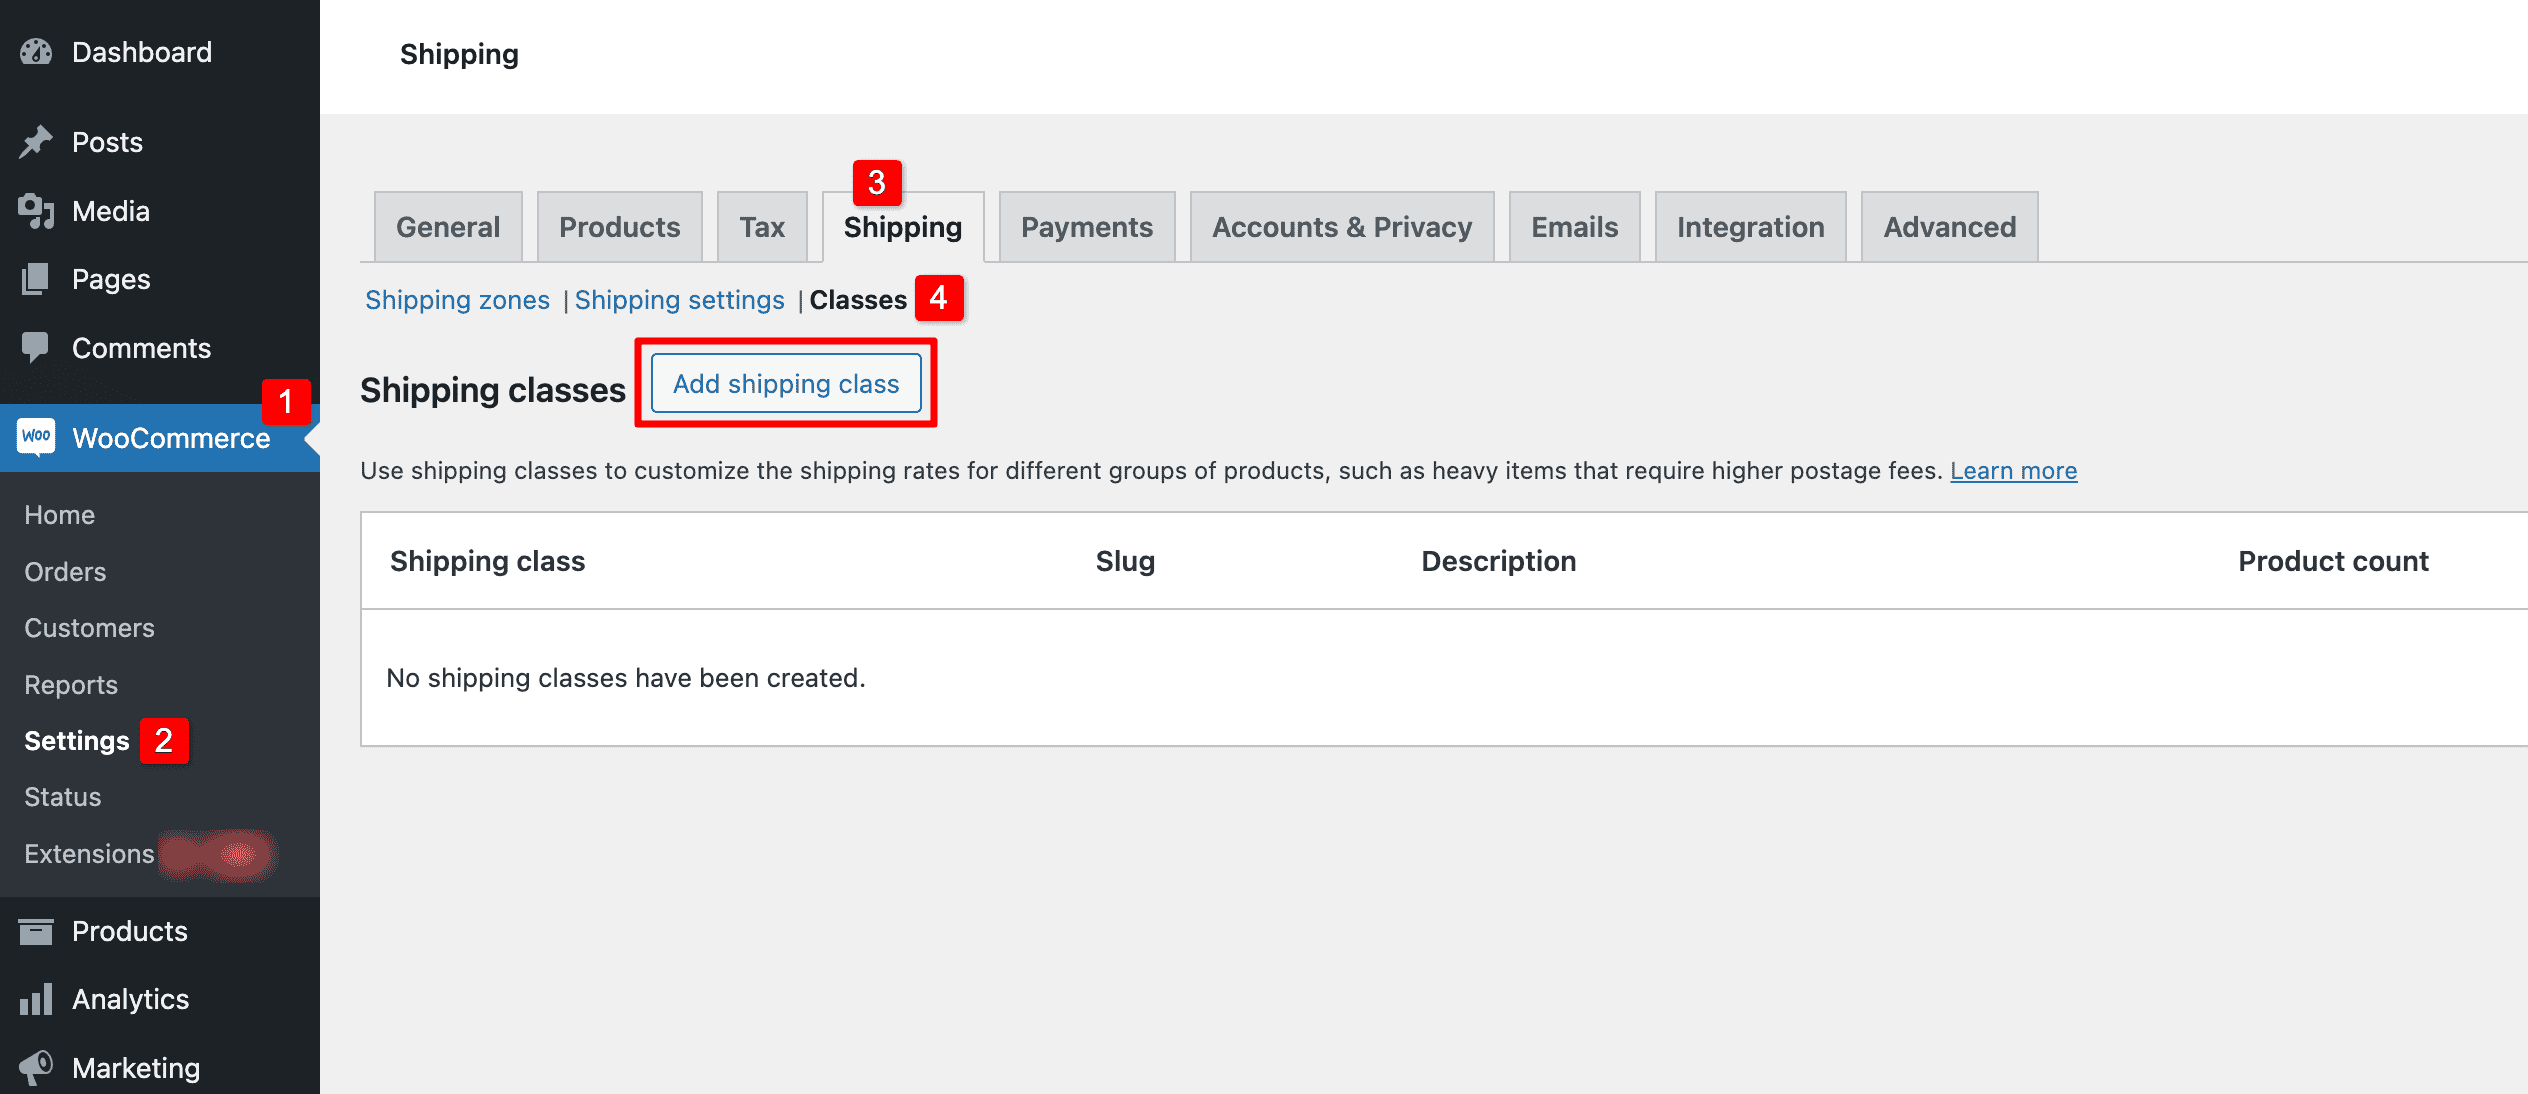
Here, you need to add details about three attributes:
- Shipping Class: As the name suggests, this lets you give a name to your shipping class.
- Slug: By default, WooCommerce uses the name of your shipping class as its slug. However, you can also set a different name for it here.
- Description: A brief explanation of why the shipping class is created.
Once you’ve included these details, go ahead and click on the “Create” button.
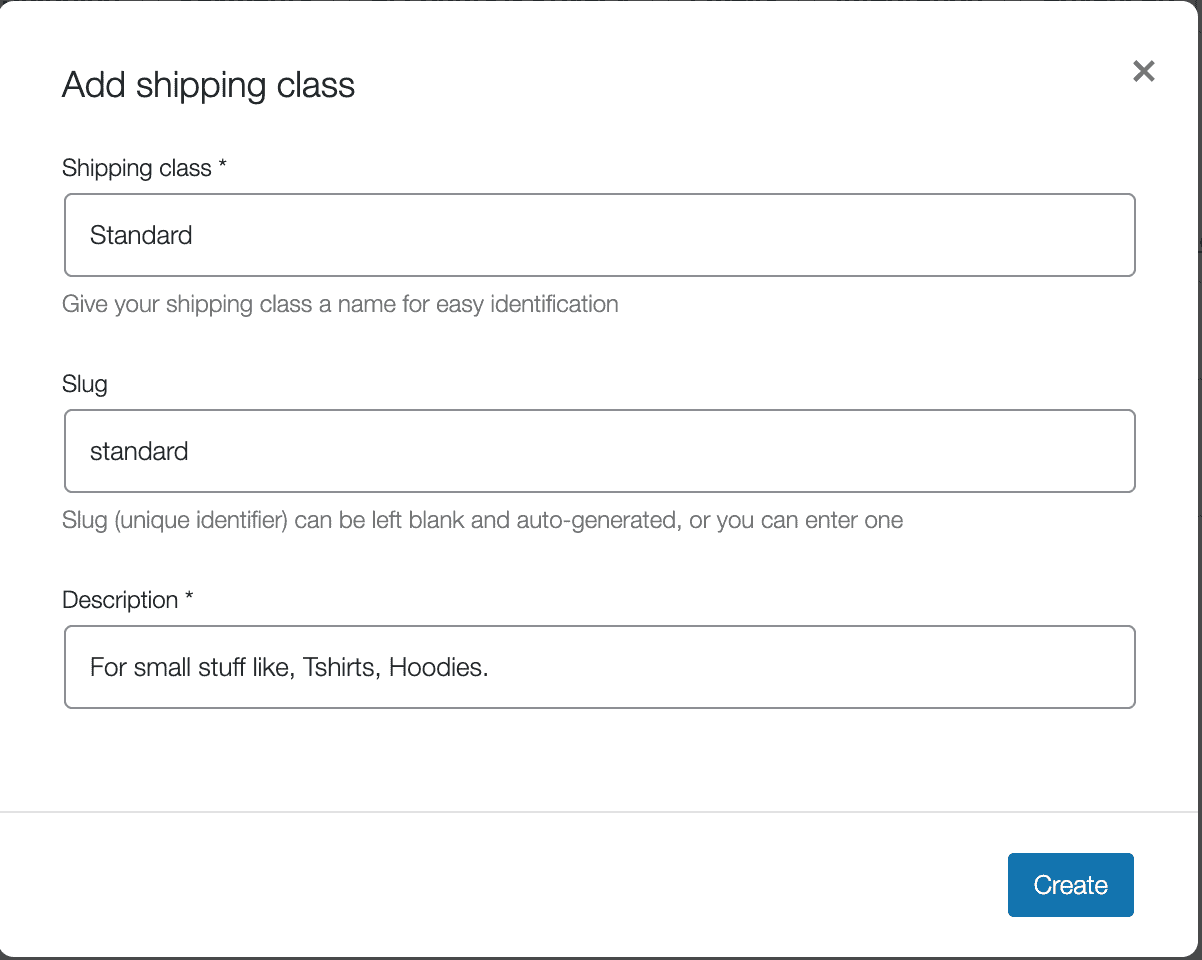
Configuring Shipping Rate for WooCommerce Shipping Classes
After you’ve created the shipping class, you need to set the shipping cost rate for each WooCommerce Shipping Class.
- To do this, navigate to the “Shipping Zones” option and click on the “Add Zone” button.
- Choose a specific zone you want to set up, and then select a certain area or region.
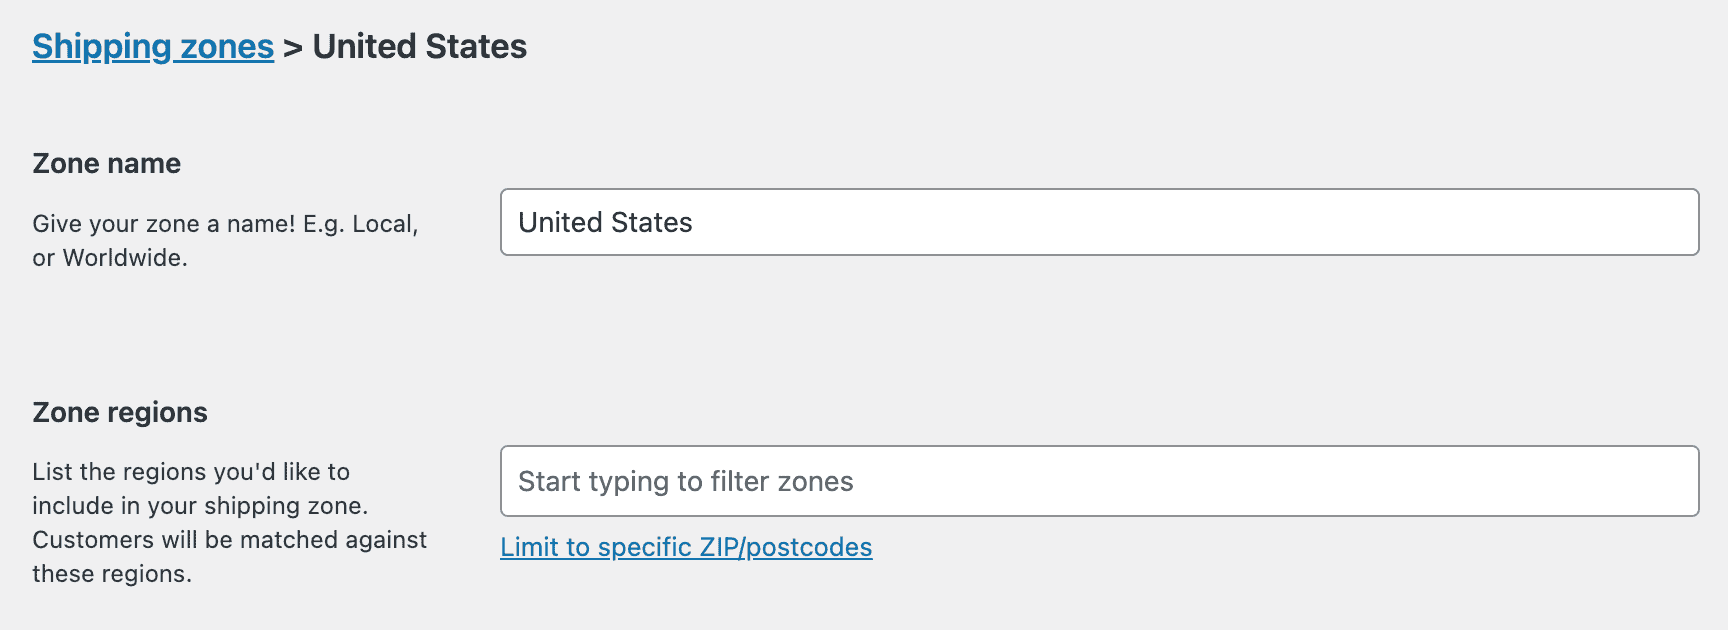
- Next, click on Add Shipping Method and choose “Flat Rate.” After that, just click continue to move forward.
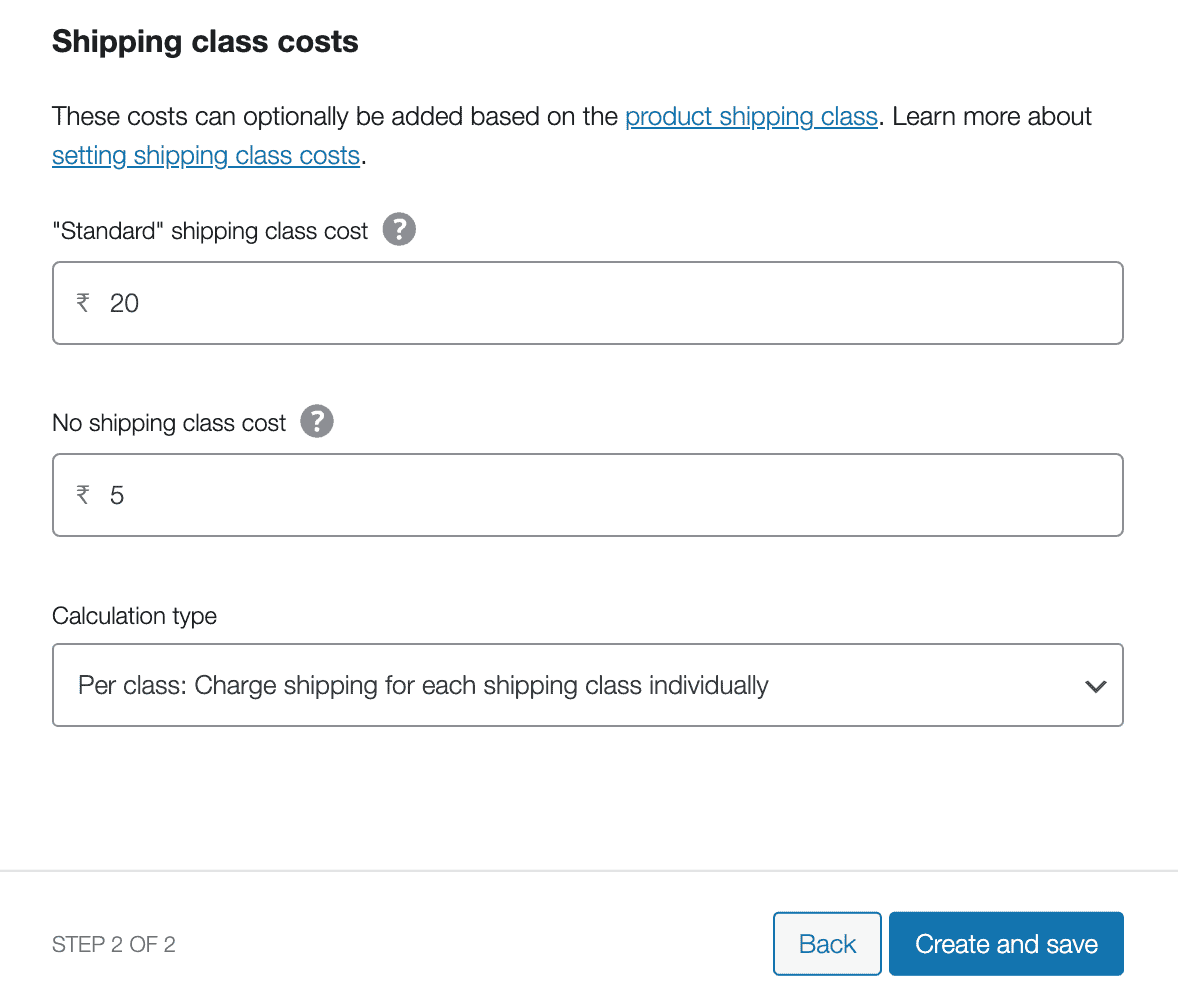
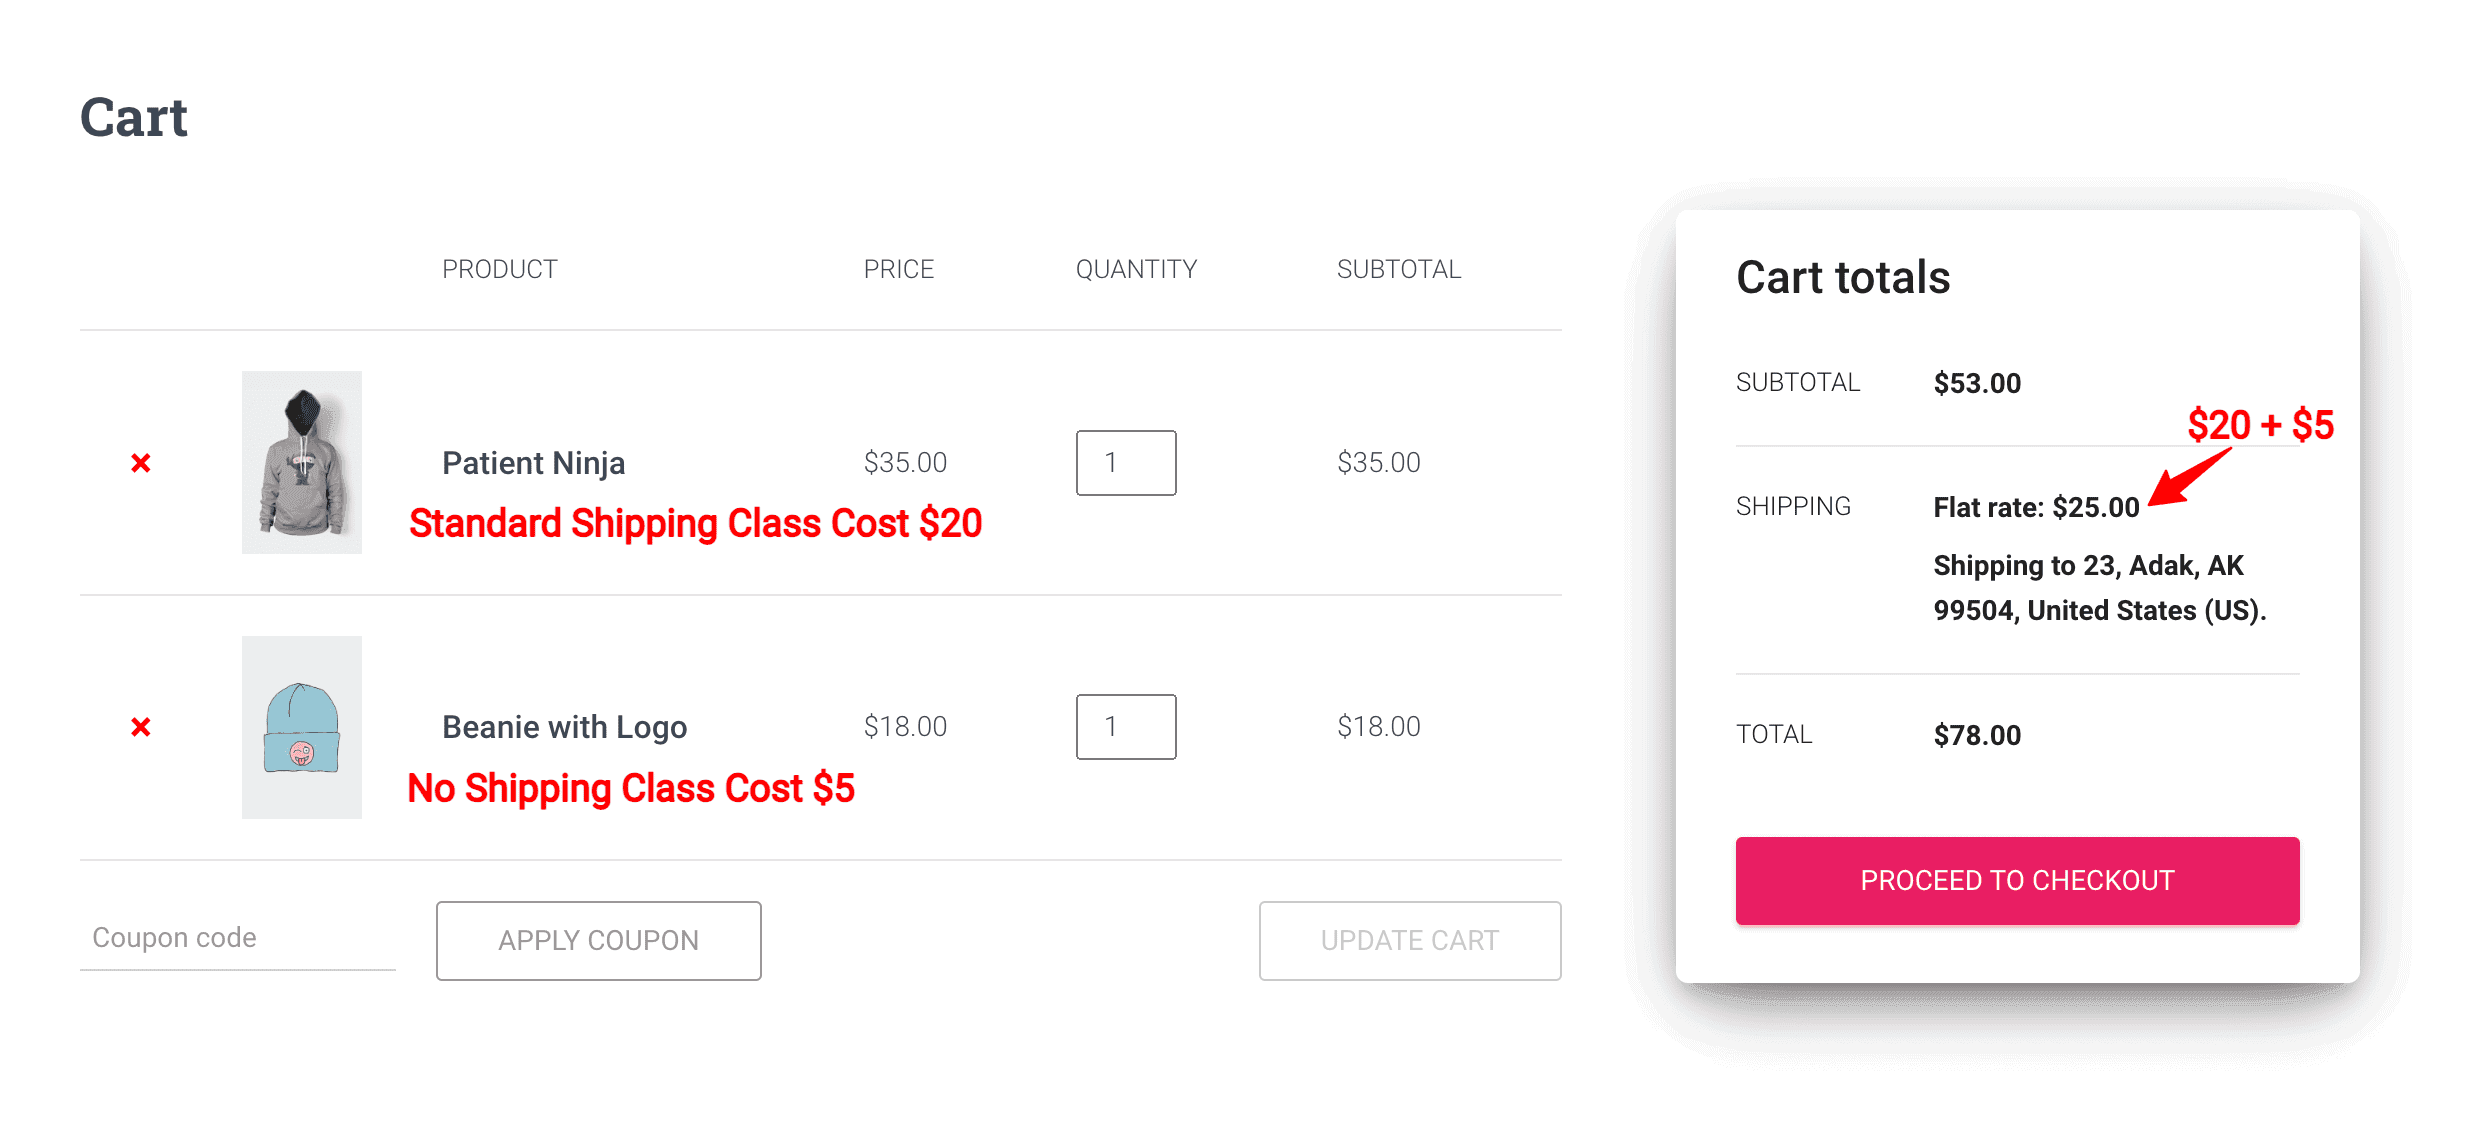
- Next, you’ll come across a part where you set the costs for different shipping classes. Here, you’ll add the prices for Standard shipping classes and then decide on a cost for no shipping class.
- Under the Calculation type, when you select the ‘Per order’ option, your cart will charge based on the highest shipping cost among all items. But if you choose ‘Per Class,’ shipping costs will be calculated separately for each shipping class.
- Once you’re done with the shipping cost configuration, click on the “Create and Save” button.
Before assigning shipping classes to products in WooCommerce, ensure you’ve already added products to your online store. If you haven’t done that yet, you can find step-by-step instructions in our Adding Products in WooCommerce article.
Adding WooCommerce Shipping Class to a Single Product
Next, we’ll talk about adding shipping class to a single product. But before we start, make sure you’ve already created your shipping class in your WooCommerce store.
- To assign a shipping class to an individual product, Go to Products➝All Products on your dashboard.
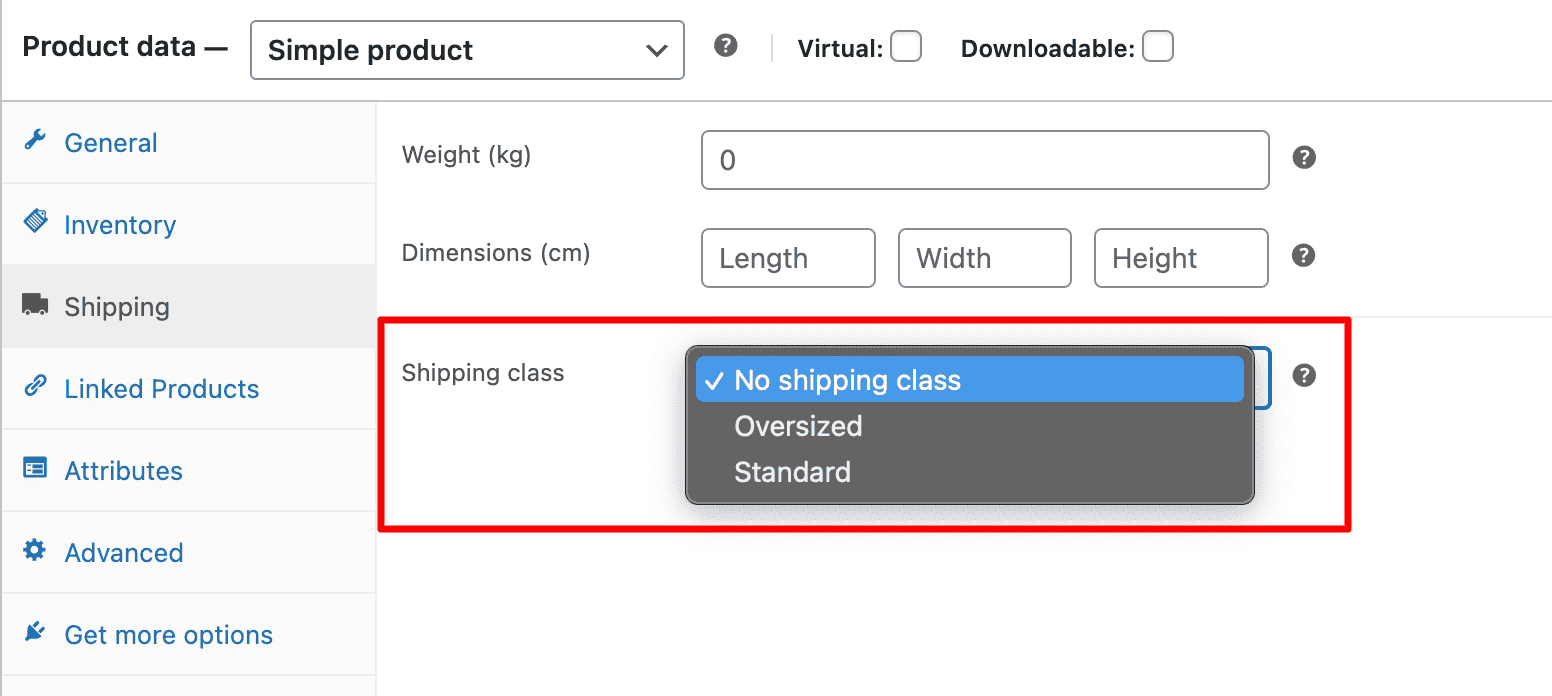
- Select the product for which you wish to assign a shipping class, and then click on the Edit button that appears directly below the product name.

- Navigate to Shipping Options and choose the shipping class under which you would like to add this product in the Shipping Class section.
- Finally, click on the Update button to save your changes.
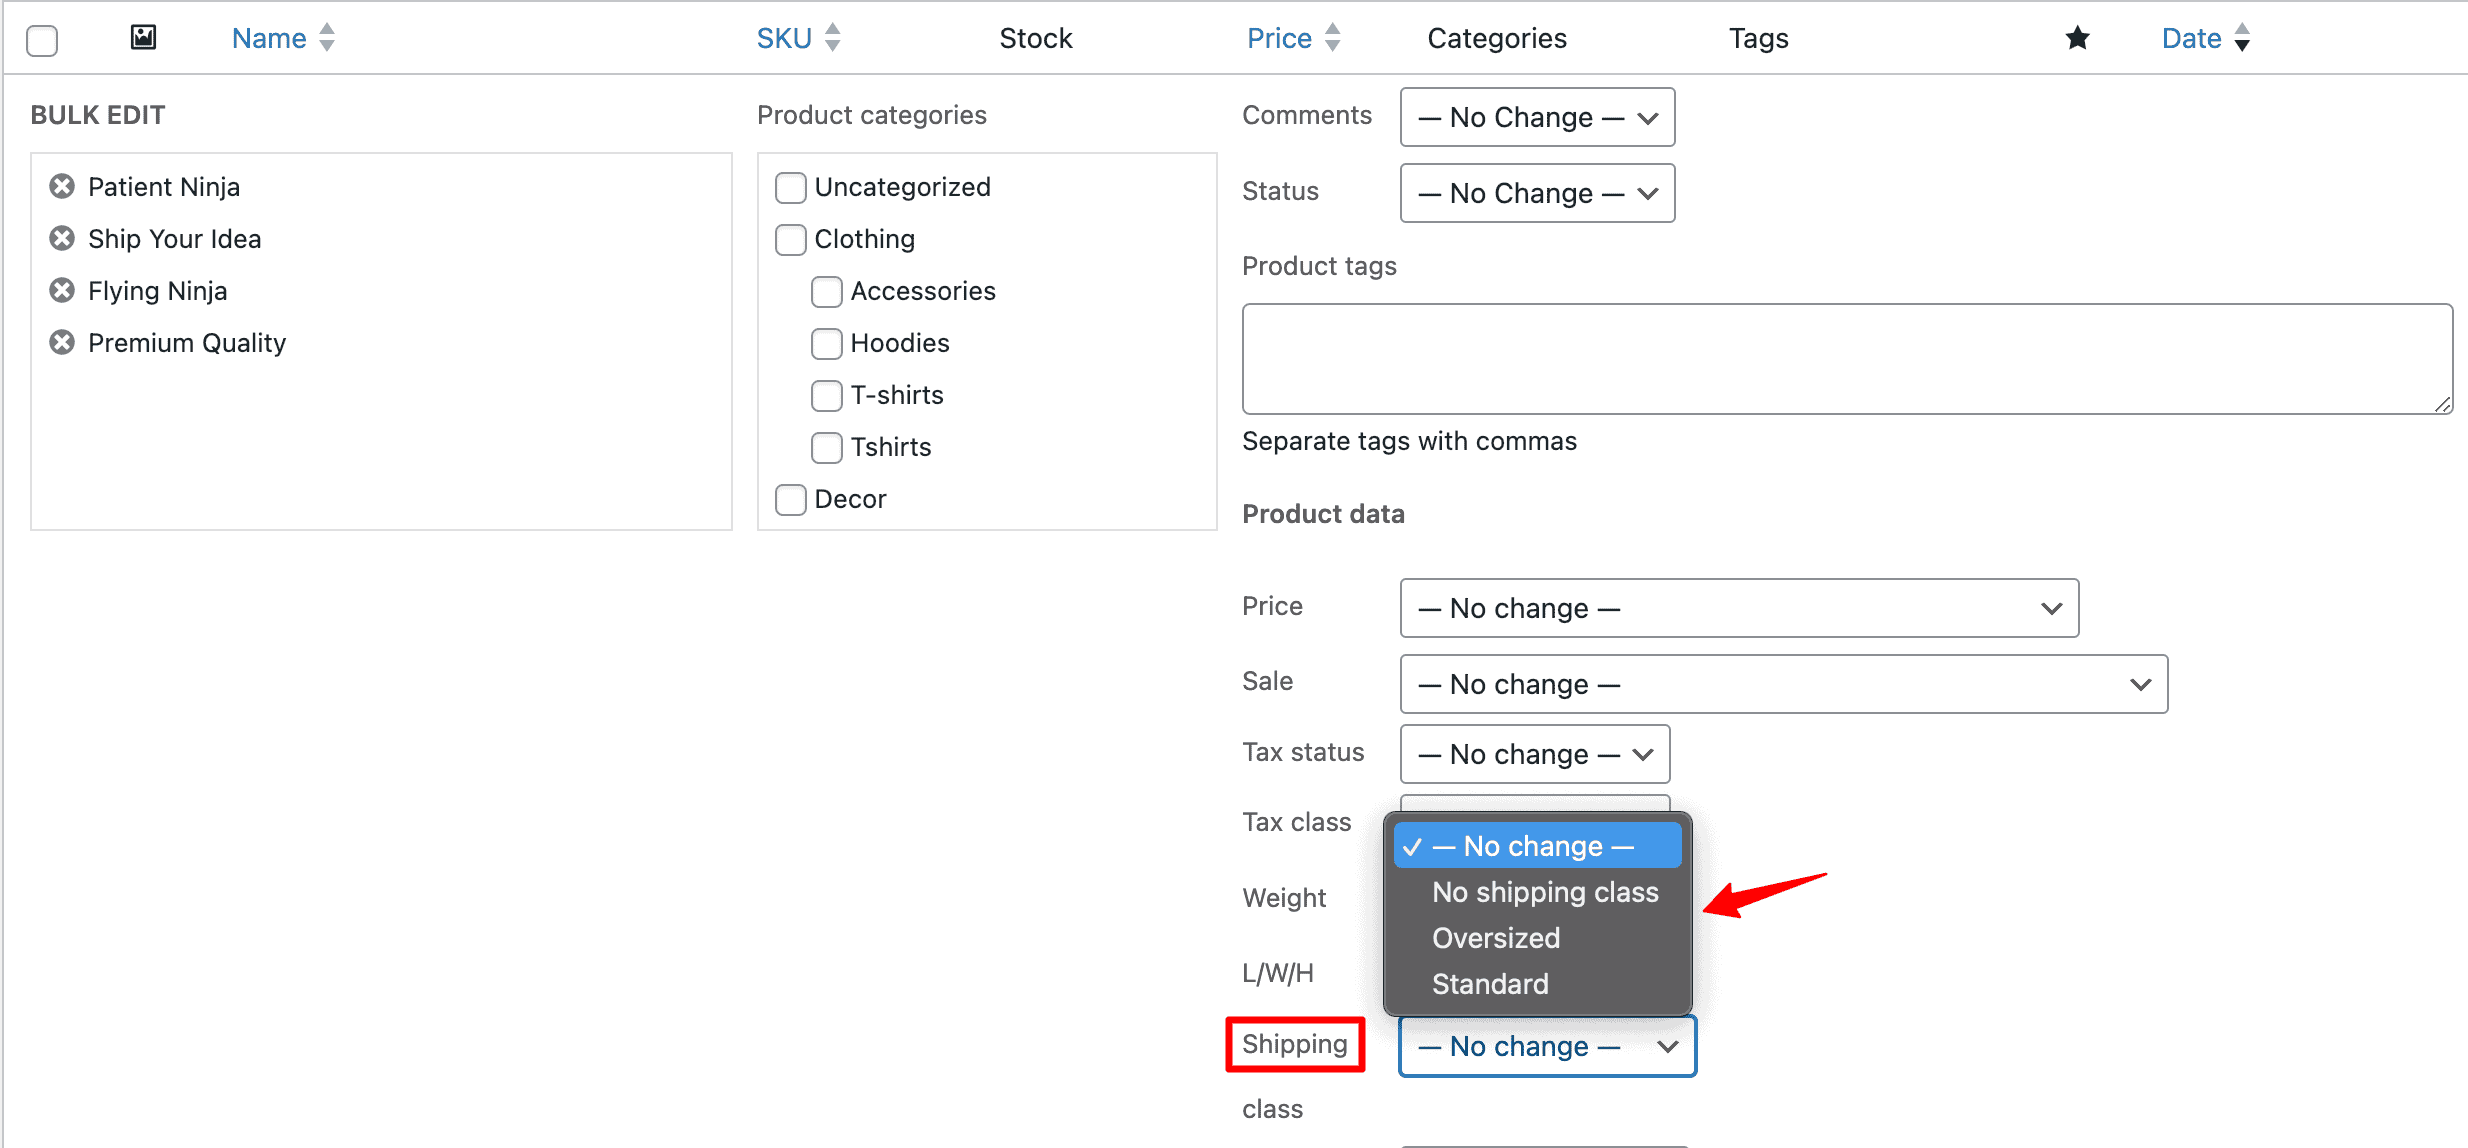
Adding WooCommerce Shipping Class to Multiple Products
- Navigate to Products➝All Products on your dashboard.
- Select the products you wish you assign a class by simply checking on the box beside the product.
- Locate the Bulk Options menu above the product list, select the Edit option, and then click on the Apply button.
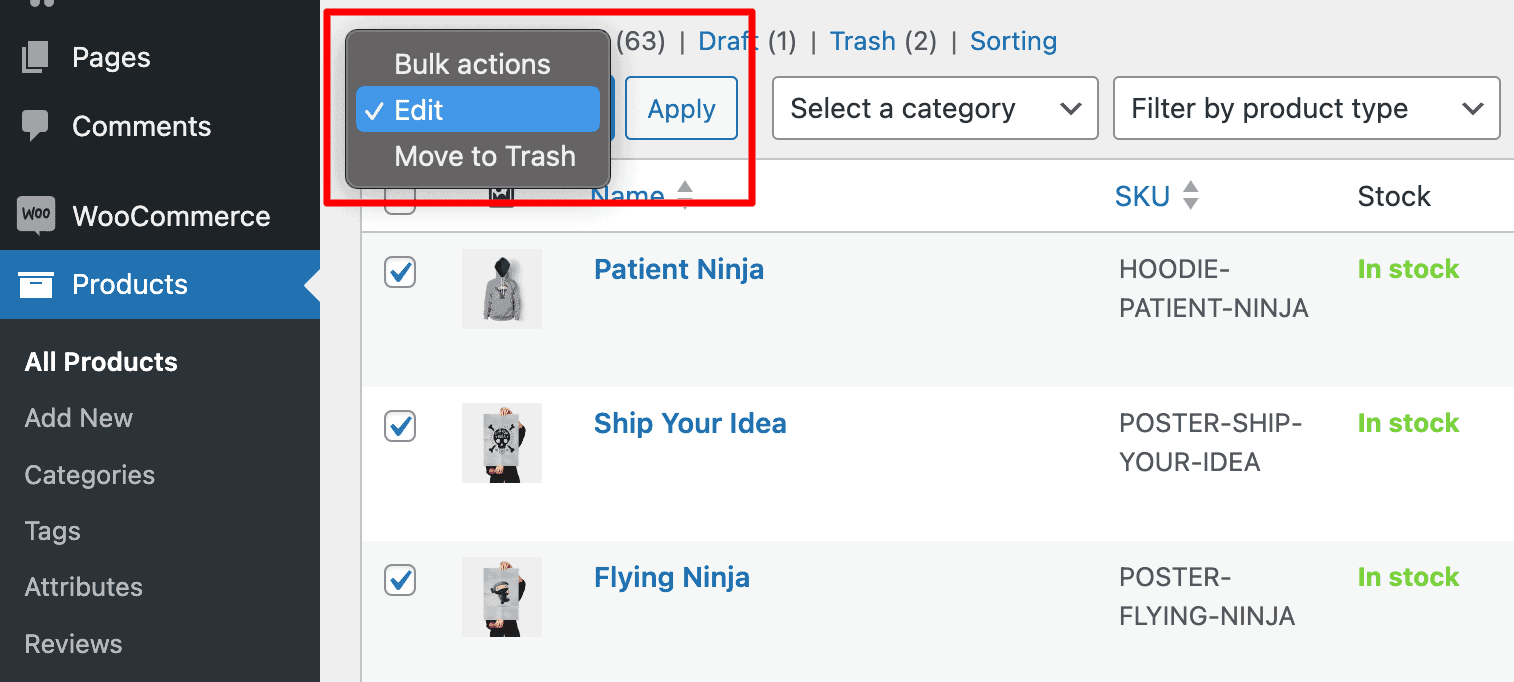
- After clicking on the button, a new window will open up, and you will have to navigate to the Shipping option and select the desired class you want to add.
- Finally, click on the update button below to save the changes.
You can also assign WooCommerce Shipping class to Products directly from Frontend using our Frontend Product Editor Plugin.
Testing Shipping Classes on the Frontend
We need to do testing to ensure that the shipping class is working. Go to the shop page of your WooCommerce store and add two products to the cart: one with a shipping class applied and another without any shipping class added.
On the checkout page, you will see that both shipping charges have been applied.
Get Started with WooCommerce Shipping Classes
Assigning shipping classes to products in WooCommerce is a straightforward process that allows you to organize and manage your shipping options efficiently. By categorizing your products into different classes based on their shipping characteristics, you gain better control over shipping costs, delivery methods, and overall logistics.
FAQs on WooCommerce Shipping Class
What is the use of Shipping Classes in WooCommerce?
Shipping classes in WooCommerce help you apply different shipping rules or rates to different types of products, making your shipping strategy more flexible and accurate.
How do I create a shipping class in WooCommerce?
Go to WooCommerce -> Settings -> Shipping -> Shipping Classes, then click Add Shipping Class. Fill in the name, slug, and description, and save.
How do I add shipping classes in bulk to multiple products?
Go to Products ➝ All Products, select multiple items, then use the bulk edit option to assign the same shipping class in one go.
What’s the difference between Shipping Class and Shipping Zone in WooCommerce?
Shipping zones define where you’re shipping to, and shipping classes define how products are shipped. They work together to create flexible shipping rules.
Can I assign multiple shipping classes to a product?
No, WooCommerce only allows one shipping class per product, but you can apply shipping methods to different product groups using zones and flat rates.

Leave a Reply