Shipping is one of the most critical parts of running a WooCommerce store. Done right, it keeps customers happy, boosts repeat orders, and maximizes profits. Done poorly, it leads to cart abandonment, bad reviews, and lost revenue.
In this complete guide, you’ll learn how to set up WooCommerce shipping zones, rates, methods, and classes — step by step. Whether you’re offering flat-rate, free shipping, or local pickup, we’ll help you configure everything smoothly. Let’s get your shipping system working for you, not against you.
Key Takeaways
- Learn how to set up WooCommerce shipping zones, methods, and classes for flexible delivery options.
- Understand how advanced cost calculations work with Flat Rate shipping.
- Explore how to customize shipping settings for a smoother checkout experience.
- Gain tips on solving common shipping issues and optimizing your setup.
- Boost customer satisfaction by offering clear, accurate, and fair shipping choices.
What Is WooCommerce Shipping?
WooCommerce offers flexible shipping options that let you tailor the delivery experience to your business needs. With shipping zones, methods, and classes, you can control how products are shipped, where they go, and at what cost—all through your WordPress dashboard.
How to Set Up WooCommerce Shipping: Step-by-Step
To begin configuring your shipping settings, please follow the step-by-step guide below.
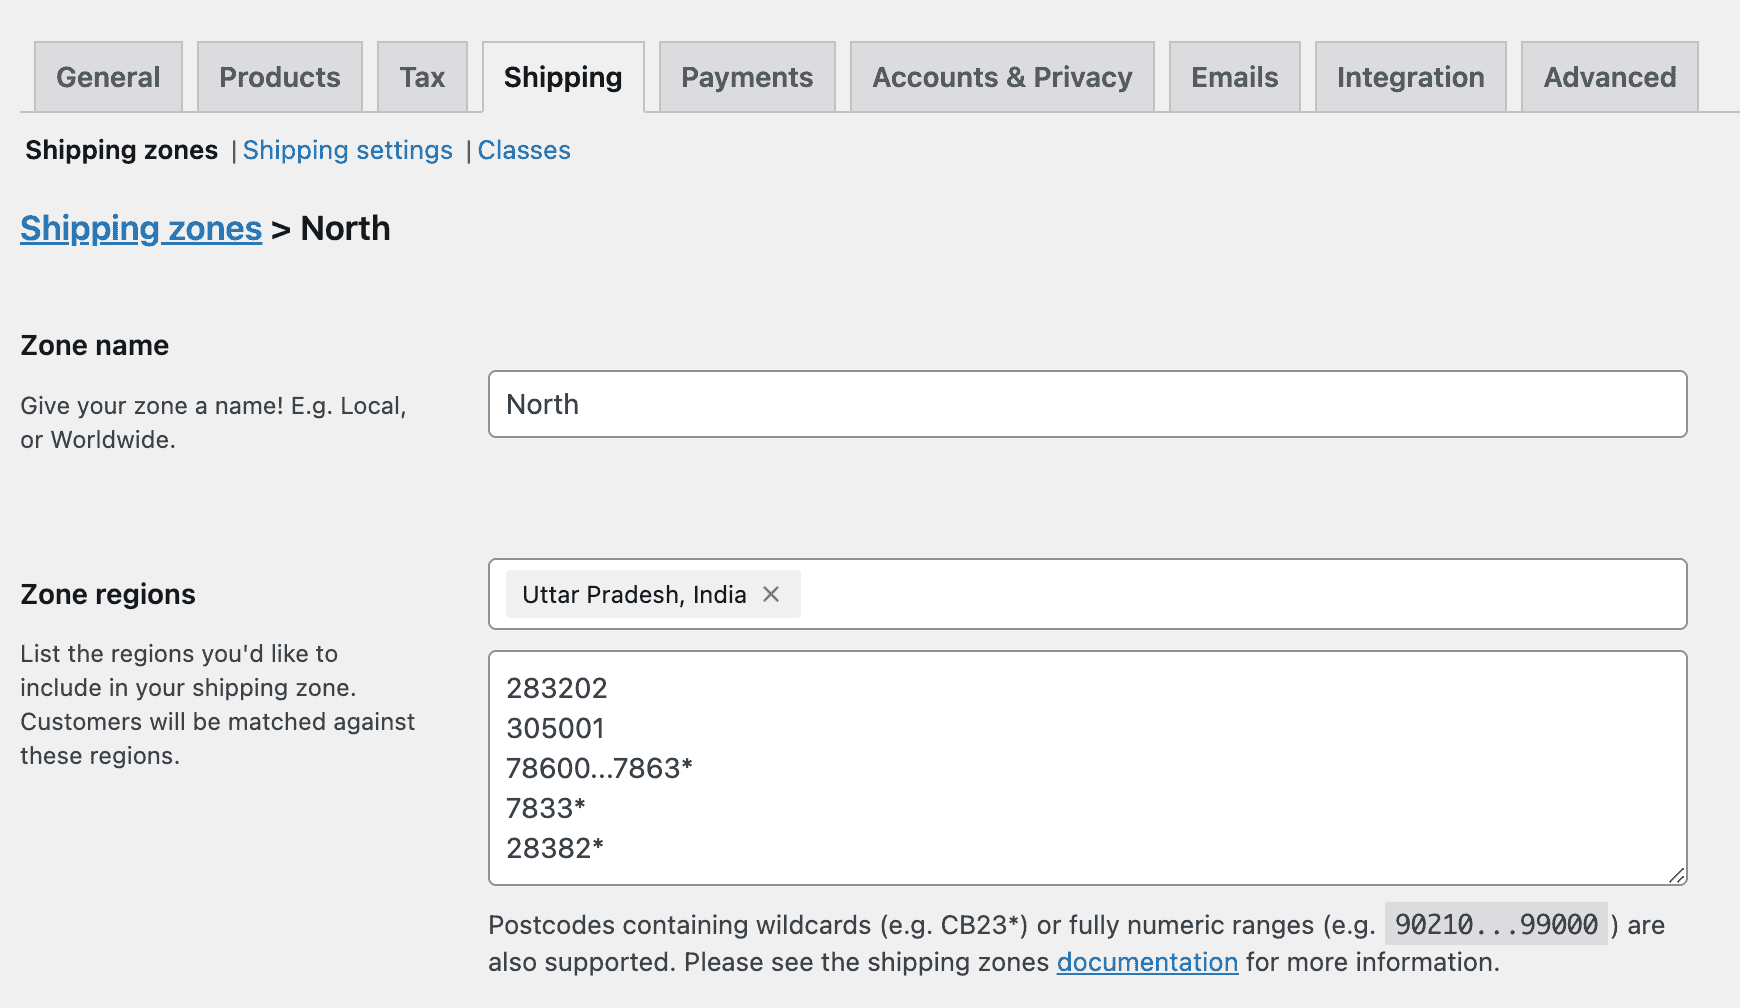
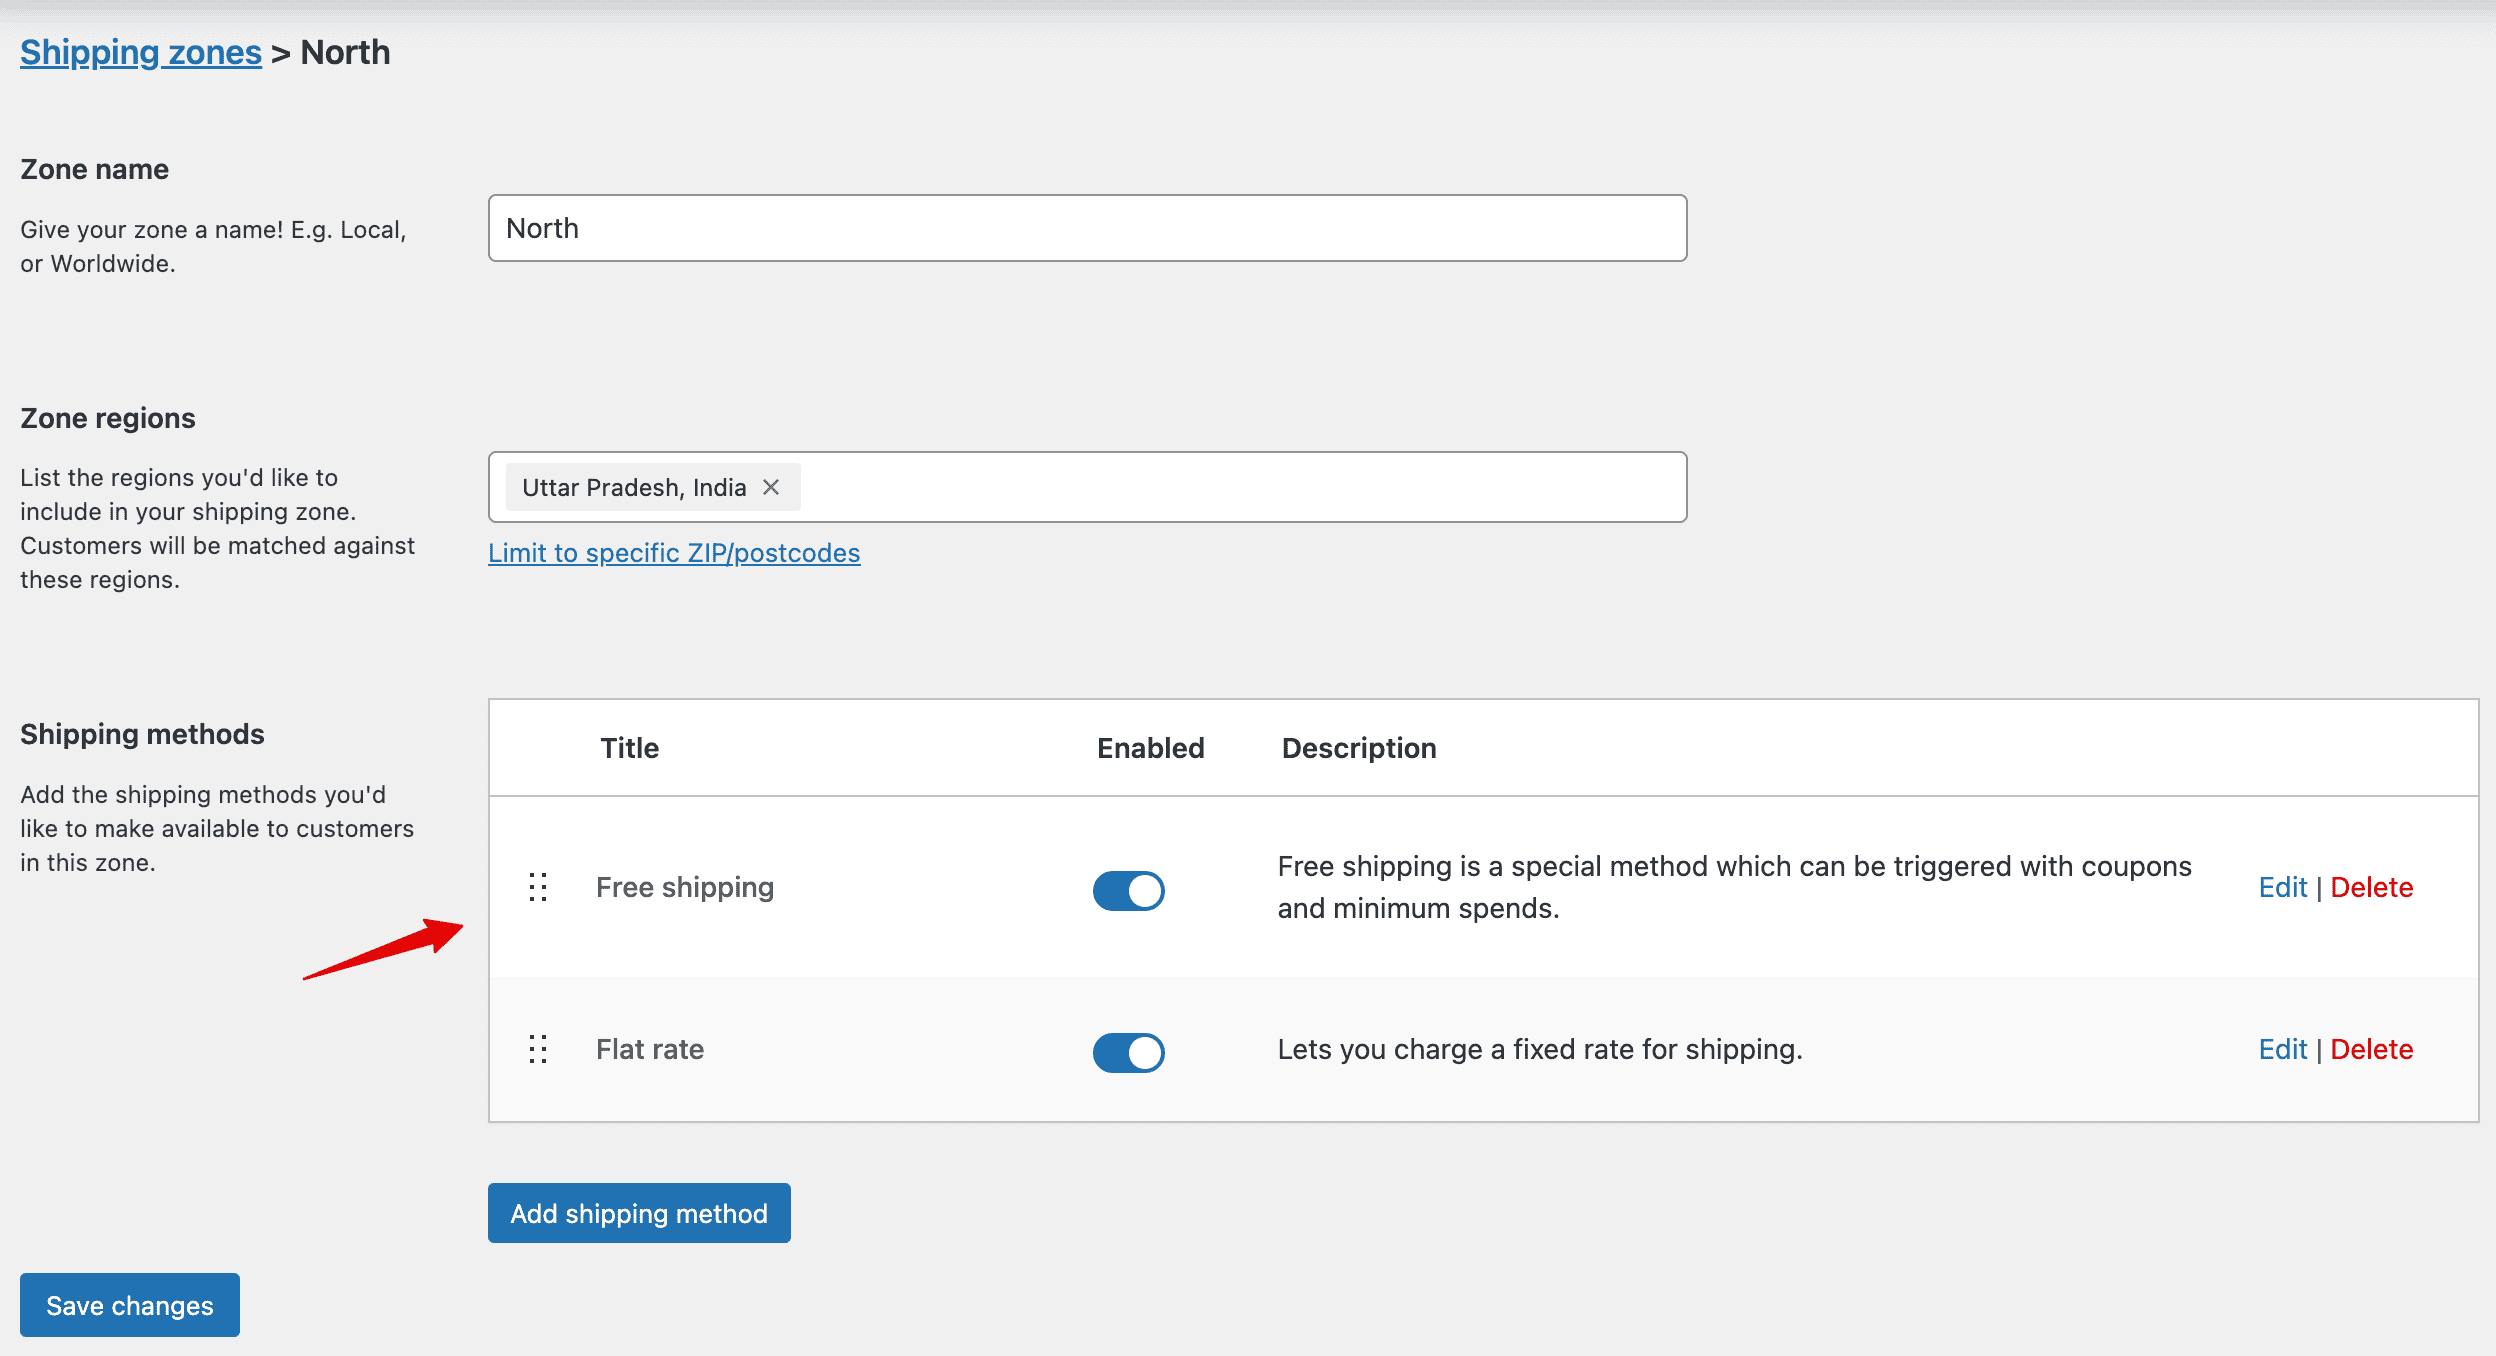
Creating Shipping Zones
A shipping zone is a geographic area where specific shipping methods and rates apply. You can create zones for entire countries, states, or even specific zip codes.
Steps to Create a Shipping Zone:
- Go to WooCommerce ➝ Settings ➝ Shipping.
If you are not able to see the Shipping option in the WooCommerce Settings Tab. Go to WooCommerce ➝ Settings ➝ General ➝ General Options. From there, navigate to Shipping Location(s) – You have to allow the Shipping settings here.

- Then, click on “Add Shipping Zone” option at the top.
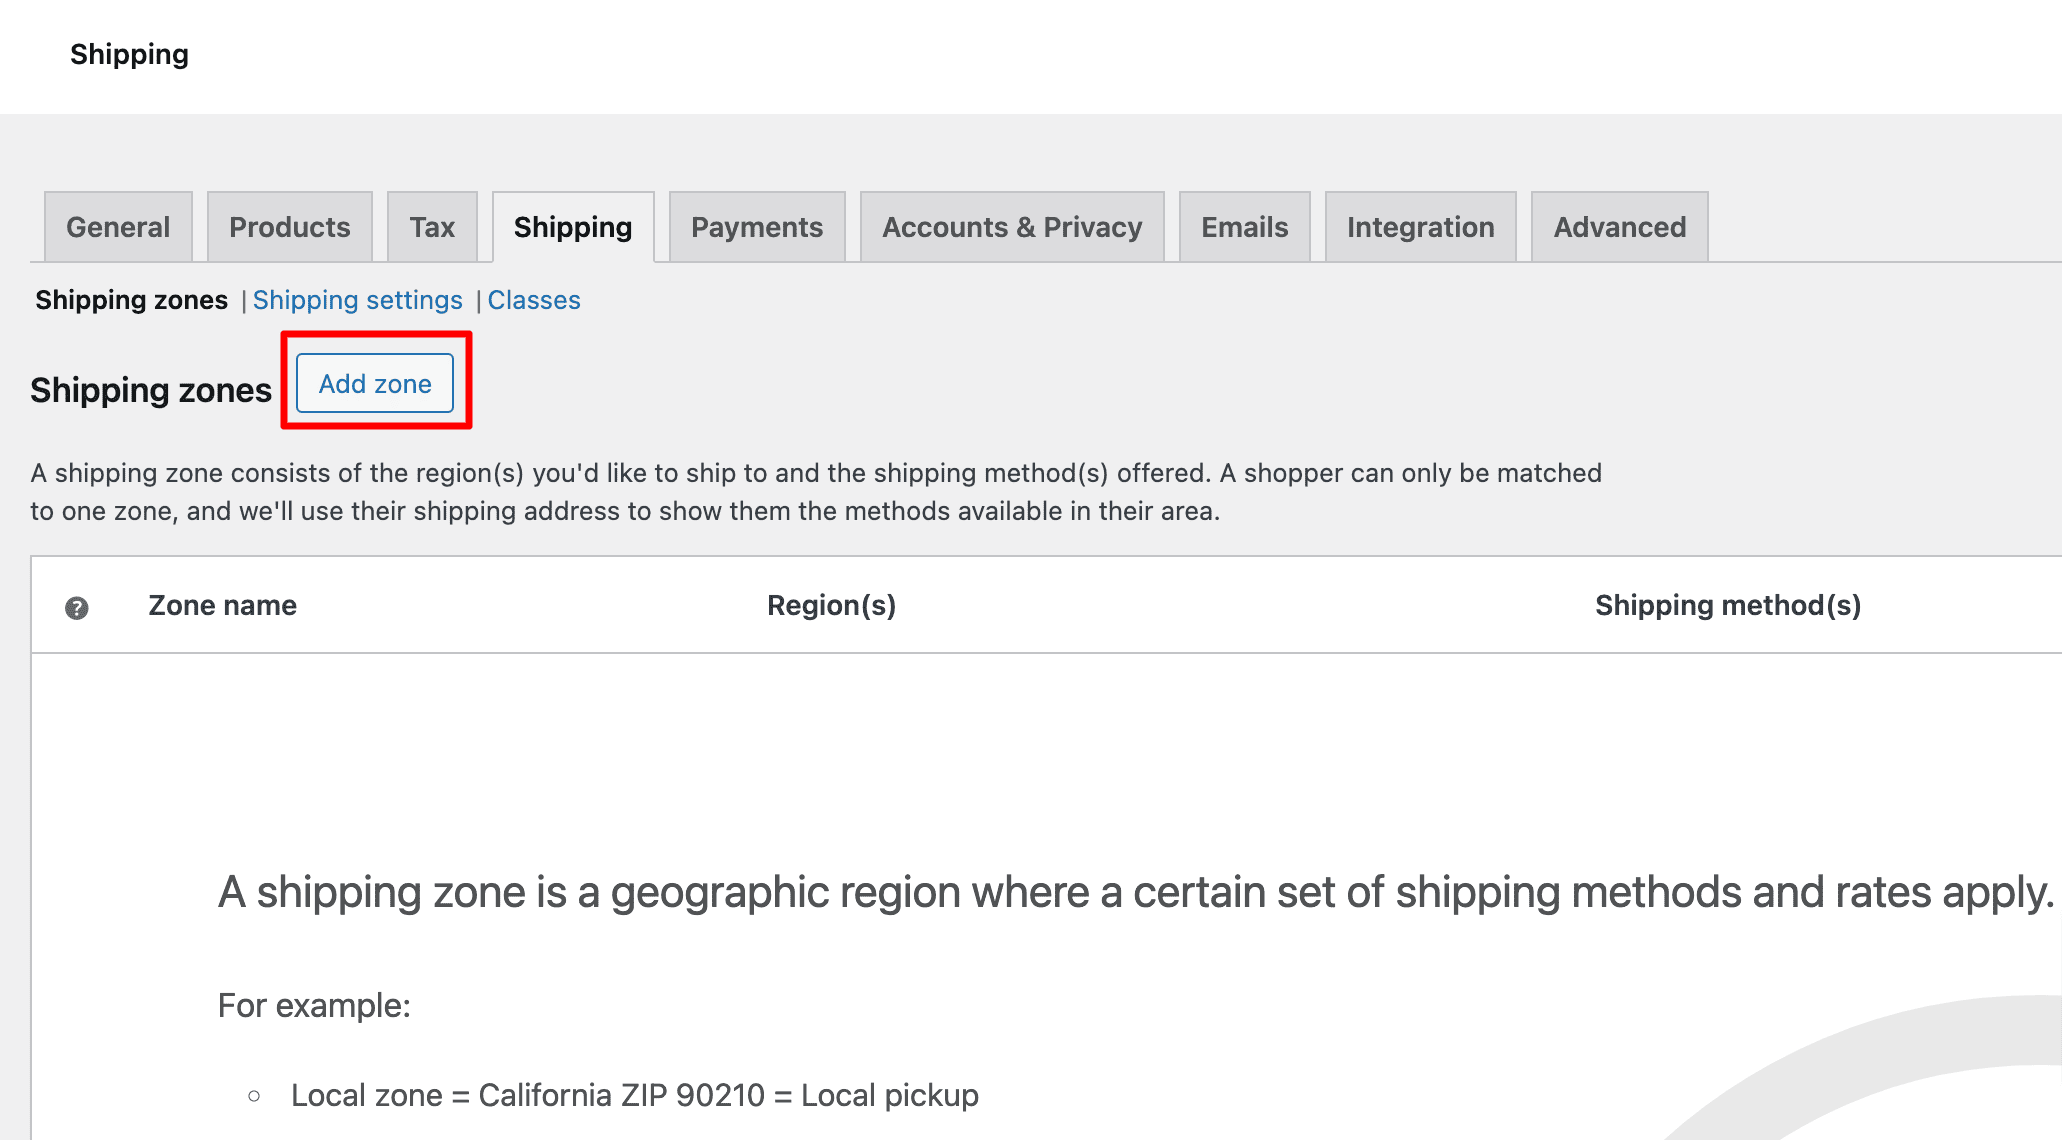
- Enter a descriptive Zone Name and select the Zone Regions to which it applies. The region can include Countries, States, and Continents.
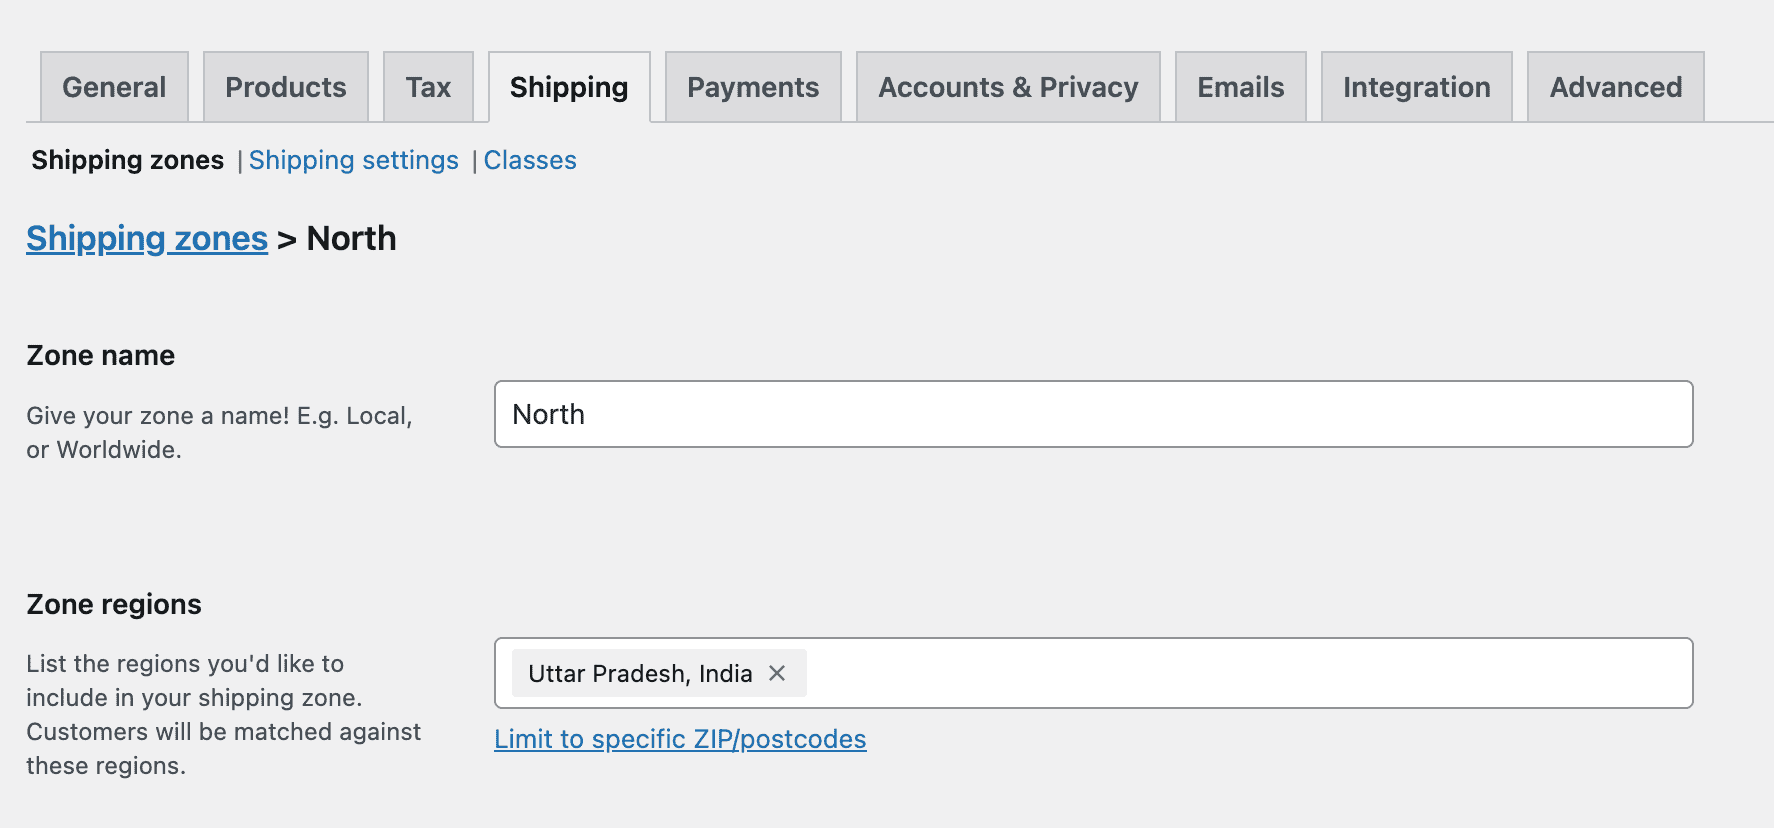
- You have also included specific zip/postcodes where the shipping will be applicable by using the Limit to specific Zip/postcodes option.
For example, you can enter postcodes individually (one per line), define a range of postcodes, or utilize a wildcard approach.
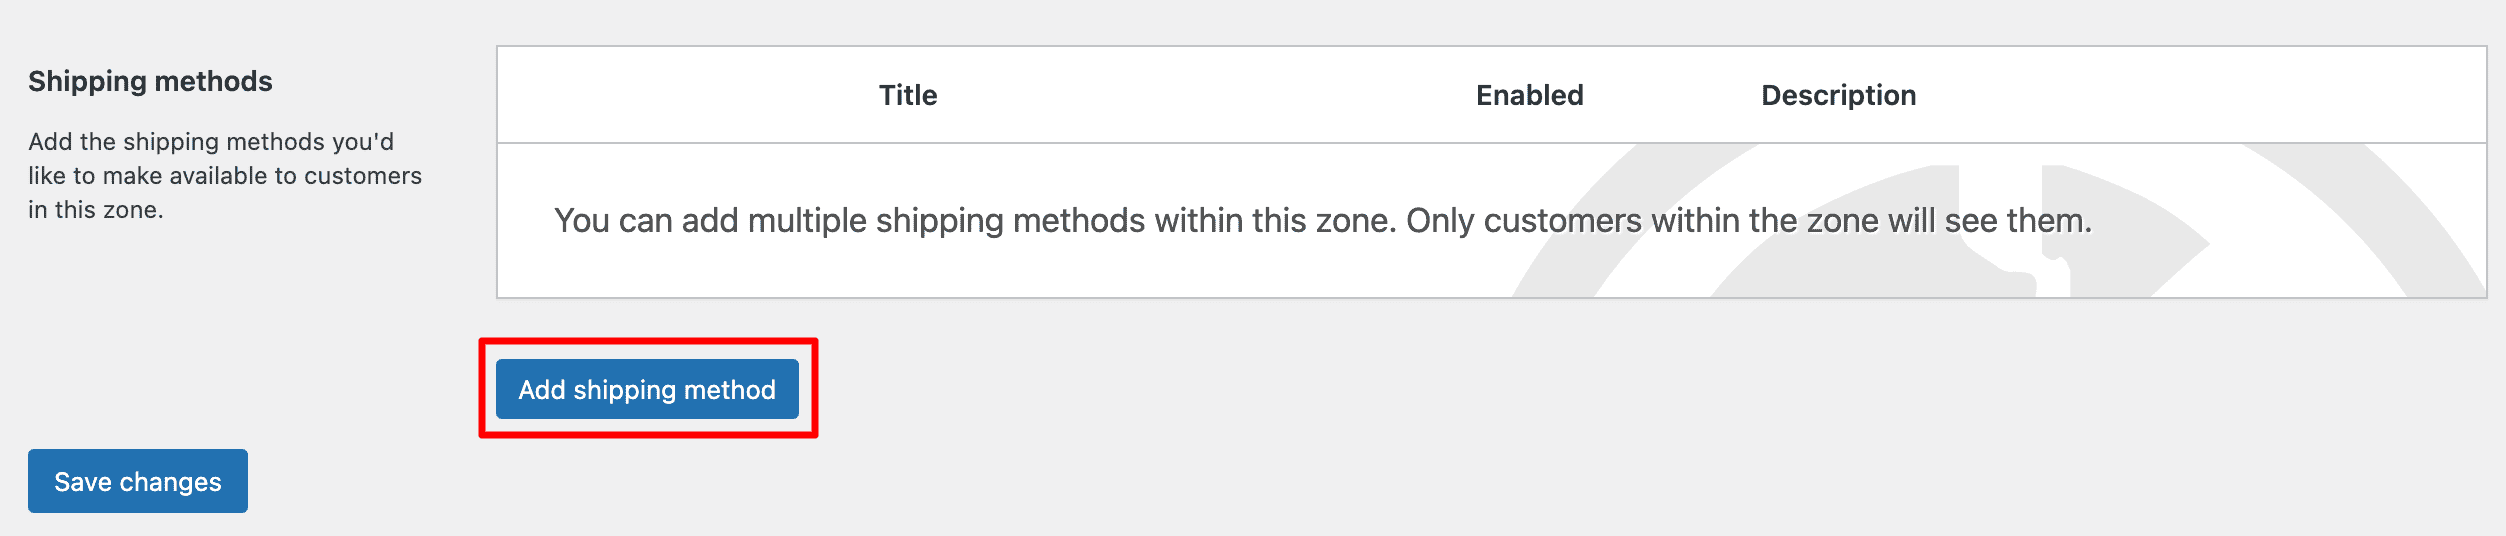
Setting Up Shipping Methods
WooCommerce provides a range of shipping methods that you can configure to meet the specific needs of your online store. Let’s explore the popular shipping methods available, including Flat Rate, Local Pickup, and Free Shipping, and walk you through the process of setting them up.
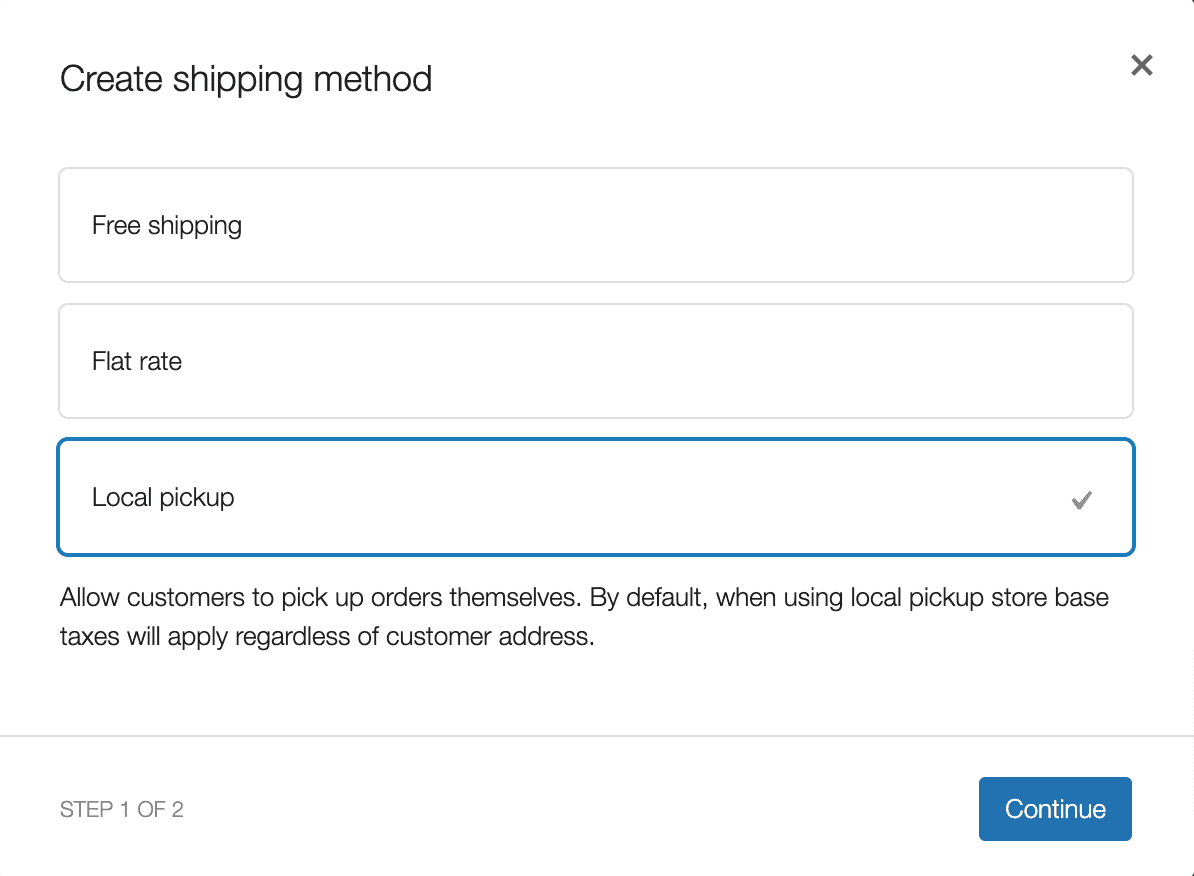
Steps to Add Shipping Methods:
- Click on the “Add Shipping Method” button.
- From the list of available options, choose the shipping method you want to add.
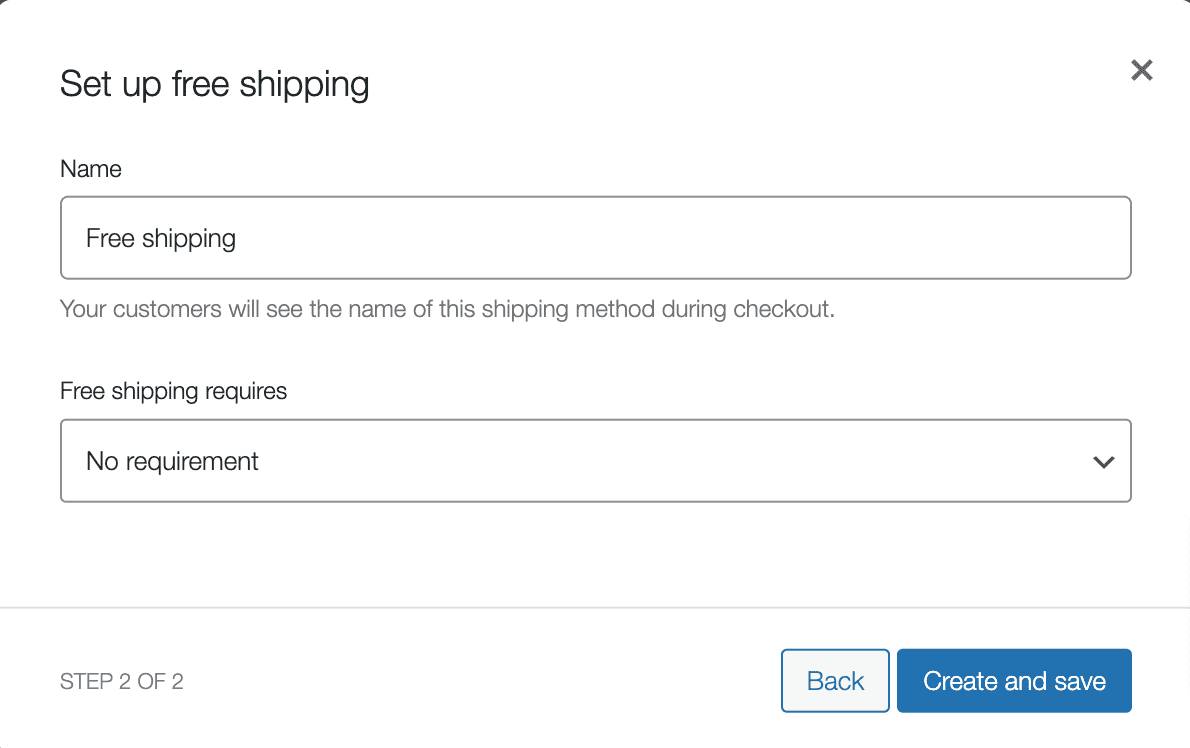
- After selecting the desired shipping method, click on the “Continue” button.
- Then, you need to adjust the settings according to the shipping method you’ve selected. After that, click on the “Create & Save” button.
Adding multiple Shipping methods
You have the flexibility to add multiple shipping methods to a single zone. This means that within a specific shipping zone, you can offer multiple options for customers to choose from during the checkout process.
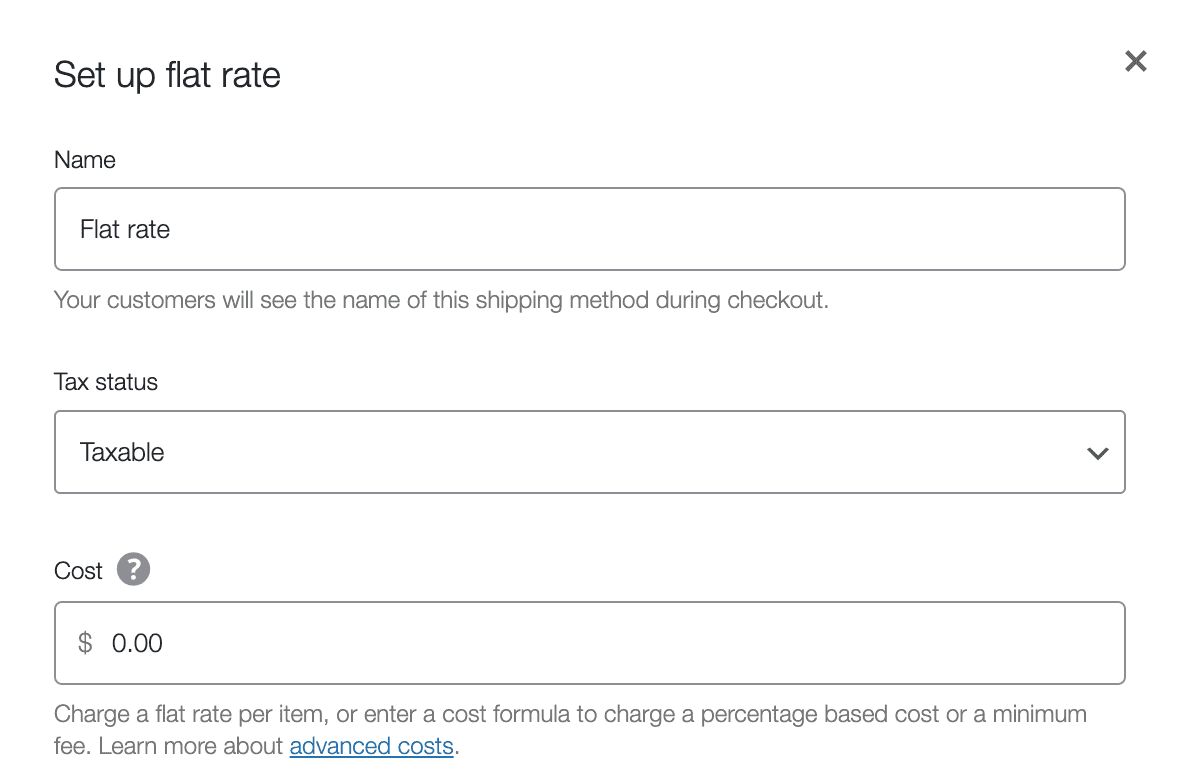
Flat Rate
It is a popular shipping method available in WooCommerce that allows you to set a fixed shipping cost for specific zones or across your entire online store. With Flat Rate Shipping, you can provide a consistent shipping rate regardless of the size, weight, or destination of the order.
Selecting Flat Rate as your shipping option will open a new window when you click the “Edit” button. This window allows you to modify and customize the settings associated with the Flat Rate shipping method.

You can specify the tax status. Additionally, you can set a method title that will be displayed to customers during checkout. Furthermore, you can enter the desired shipping charge in the Cost field. For example, if you wish to charge $30, you would enter “30.00” in the field.
The price you set for the Flat Rate shipping method will be applied to the entire shopping cart. If you need more information about advanced cost options, you can click on the question mark next to the field title to learn more, which will be discussed later.
After configuring the pricing and any advanced options, click “Save Changes” to save your settings.
Local Pickup
It allows customers to collect their orders directly from a designated location, such as a physical store or a specified pickup point. This shipping option provides a convenient and cost-effective solution for customers who prefer to pick up their purchased items in person, eliminating the need for traditional shipping services.
Similar to Flat Rate, after selecting Local Pickup as the shipping method, clicking on the “Edit” button will open a new window where you can modify the settings specific to the Local Pickup method.
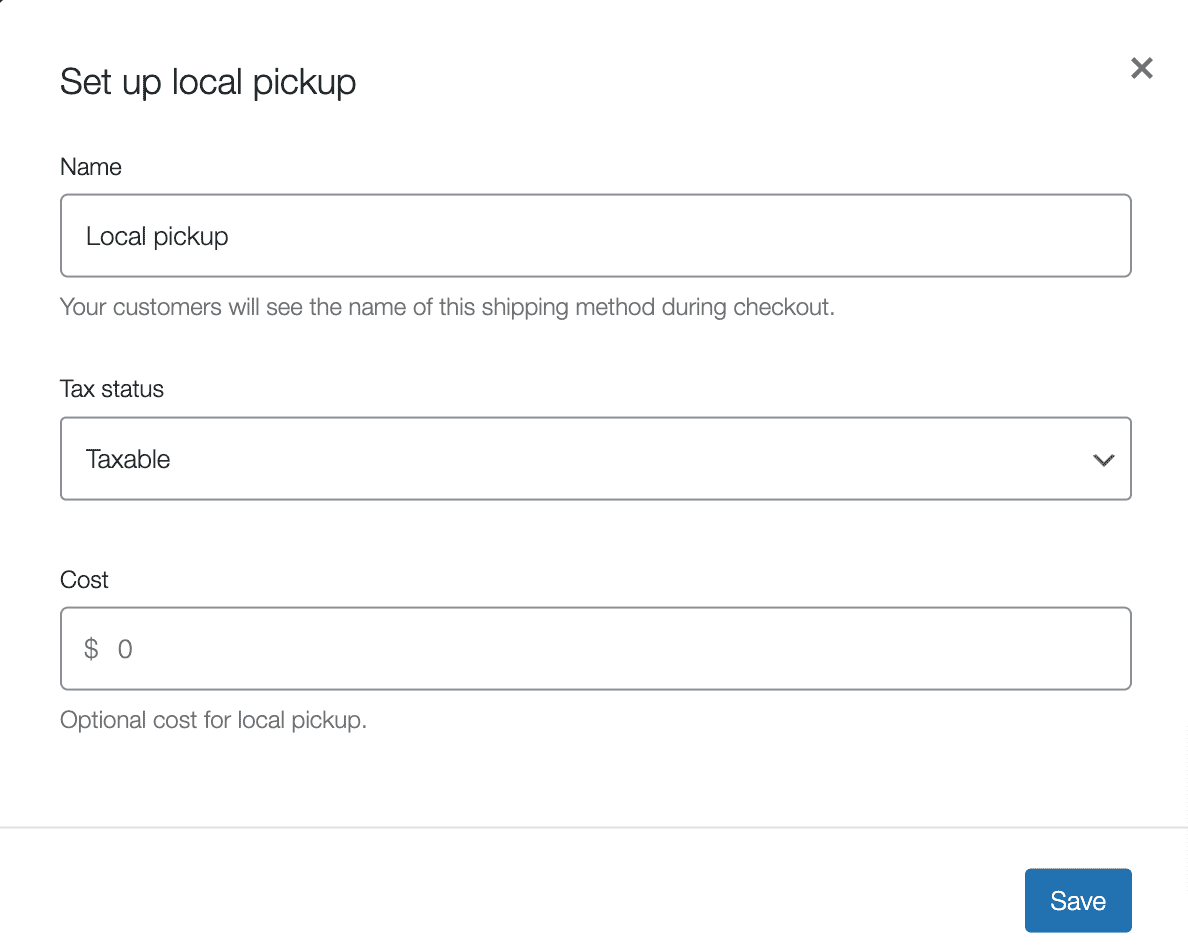
You generally don’t need to enter a delivery cost since the customer will be collecting the item themselves, usually from your physical store. However, it’s important to note that by default, the taxes for local pickup in WooCommerce are calculated based on the location of your store rather than the customer’s address.
Free Shipping
It will allow you to offer your customers shipping without any additional cost. This means you can provide a seamless shipping experience by not charging any fees based on specific conditions defined in the Free Shipping method settings.
By selecting the Free Shipping method in WooCommerce, you can access the settings through the “Edit” button, which opens a new window. Within this window, you have the flexibility to customize and define the criteria for offering free shipping to your customers.
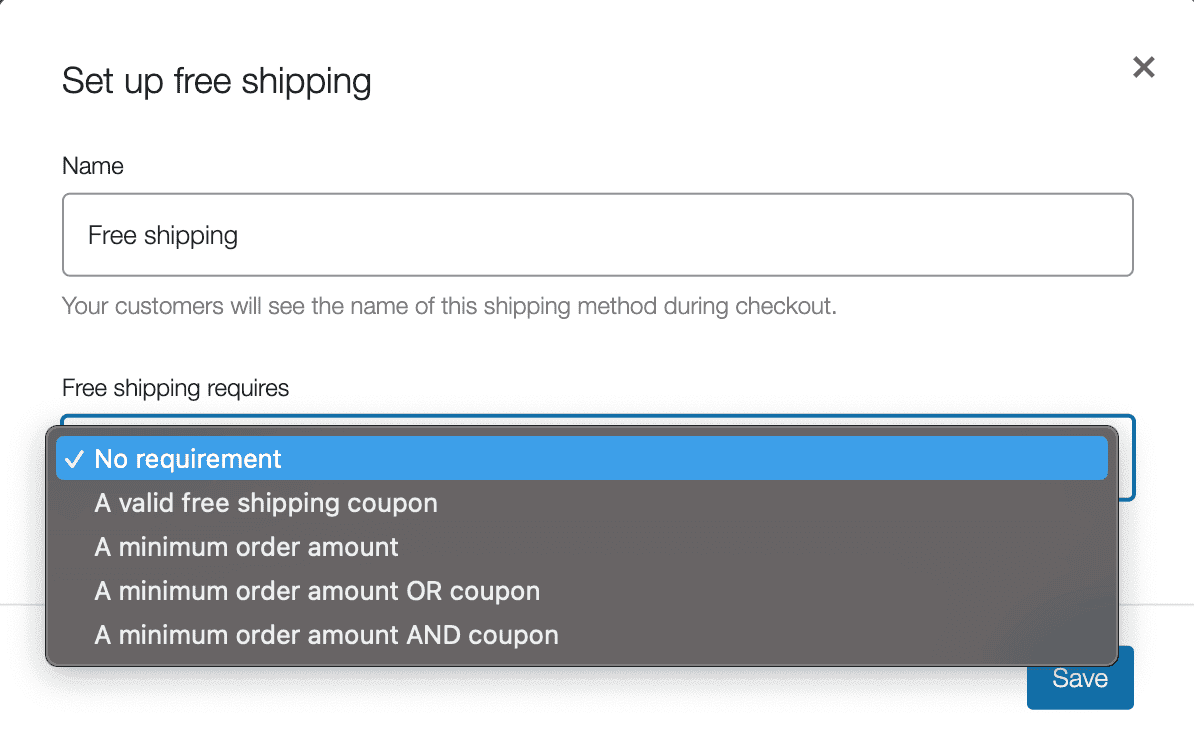
Within the Free Shipping method settings, you have the option to input a method title and select a prerequisite for offering free shipping.
This section provides you with four different options to define the criteria that must be met to qualify for free shipping, as shown in the screenshot above. Alternatively, if you prefer not to set any specific criteria, you can simply select “N/A.”
To utilize the coupon criteria, it is essential to have a coupon created within your WooCommerce setup. For detailed instructions on How to create coupons in WooCommerce, please refer to our article.
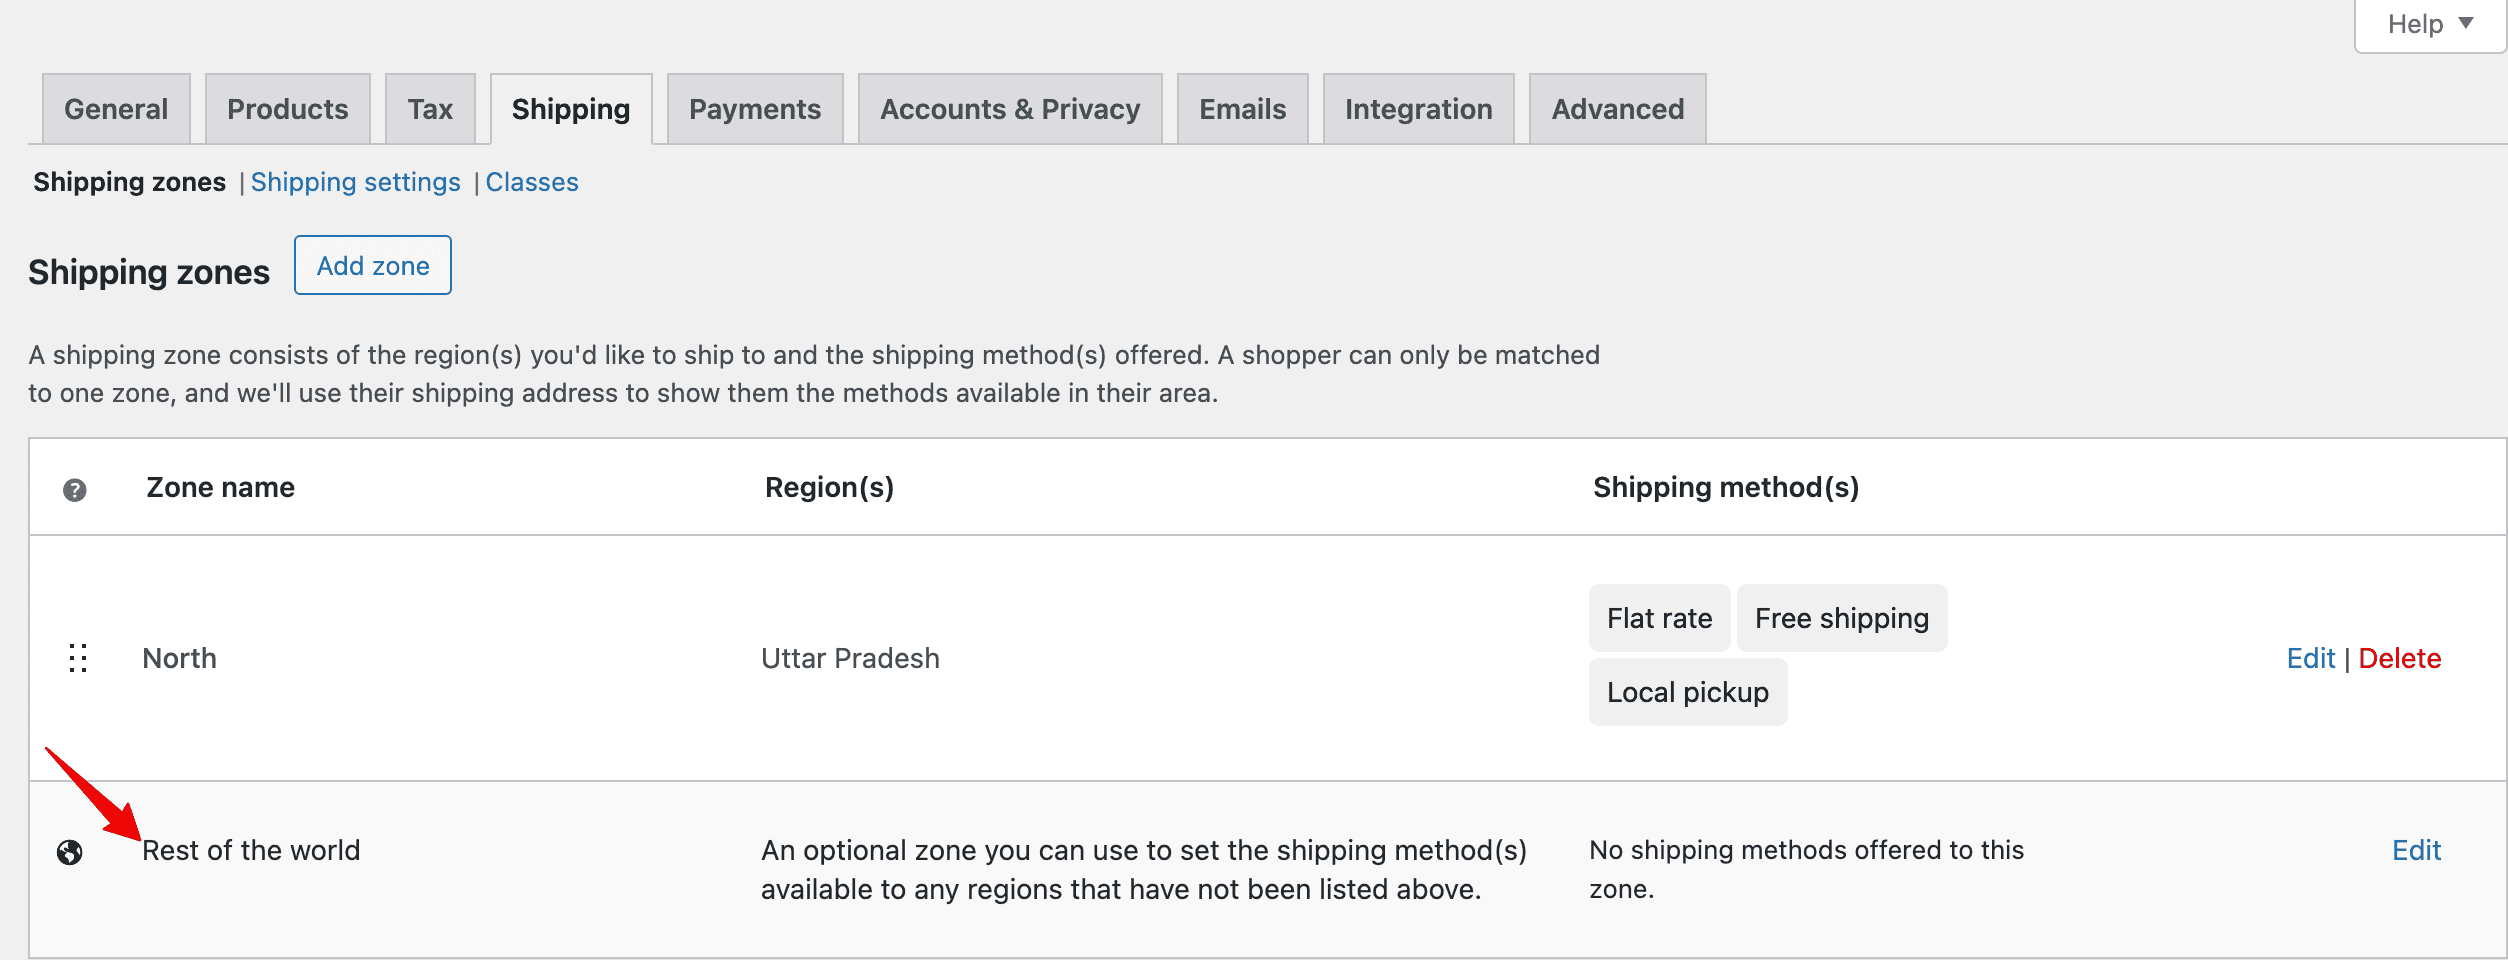
- Rest of the World feature is designed for customers who do not match any of the custom zones you have created. It serves as a fallback option for handling orders from locations that are not specifically covered by your defined shipping zones. Adding shipping methods to this zone is optional and can be based on your individual business requirements.
Calculating Shipping Rates & fees
When it comes to calculating shipping fees, the options available within the Flat Rate shipping method can initially appear overwhelming. However, with a little practice and experimentation, this section will become a valuable resource for managing your fees effectively.
Let’s explore some of the advanced options you have within the Flat Rate shipping method:
- *[qty]: Utilize this option to calculate shipping costs based on the number of items customers have in their shopping carts.
- *[fee]: This feature allows you to incorporate shipping costs based on the total value of the order.
When utilizing the [fee] setting, you have access to additional considerations, including:
- *percent: This enables you to calculate the shipping costs as a percentage of the order total.
- *min_fee: You can set a minimum threshold for the additional fees, ensuring a minimum amount is charged for shipping.
- *max_fee: This option allows you to define a maximum limit for the additional fees, ensuring that shipping costs do not exceed a certain amount.
Suppose you opt for Flat Rate shipping as your chosen shipping method. In the Cost column, you can input one of the options mentioned above. By using the [qty] placeholder, you can add a fee for each item added to a customer’s shopping cart. For example, if you enter “3 + (6 * [qty])” in the Cost field, it means you have set a$3 flat shipping fee, and an additional $6.00 will be charged for each item added to the cart. That means, if the quantity is 5, the total charge will amount to $33.
On the other hand, if you utilize the [fee] placeholder, you have the option to add an additional shipping price calculated as a percentage of the total purchase amount. For instance, by inputting “1 + [fee percent=”4″ max fee=”26″],” the shipping cost would consist of a base fee of $1.00 plus 4% of the total purchase price, which will not exceed a maximum of $25.
Let’s consider a scenario where the total purchase price is $700. In this case, despite 4% of $700 amounting to $28, the customer would only be charged an additional $26. Thus, the customer’s total payment in this scenario would be $27.
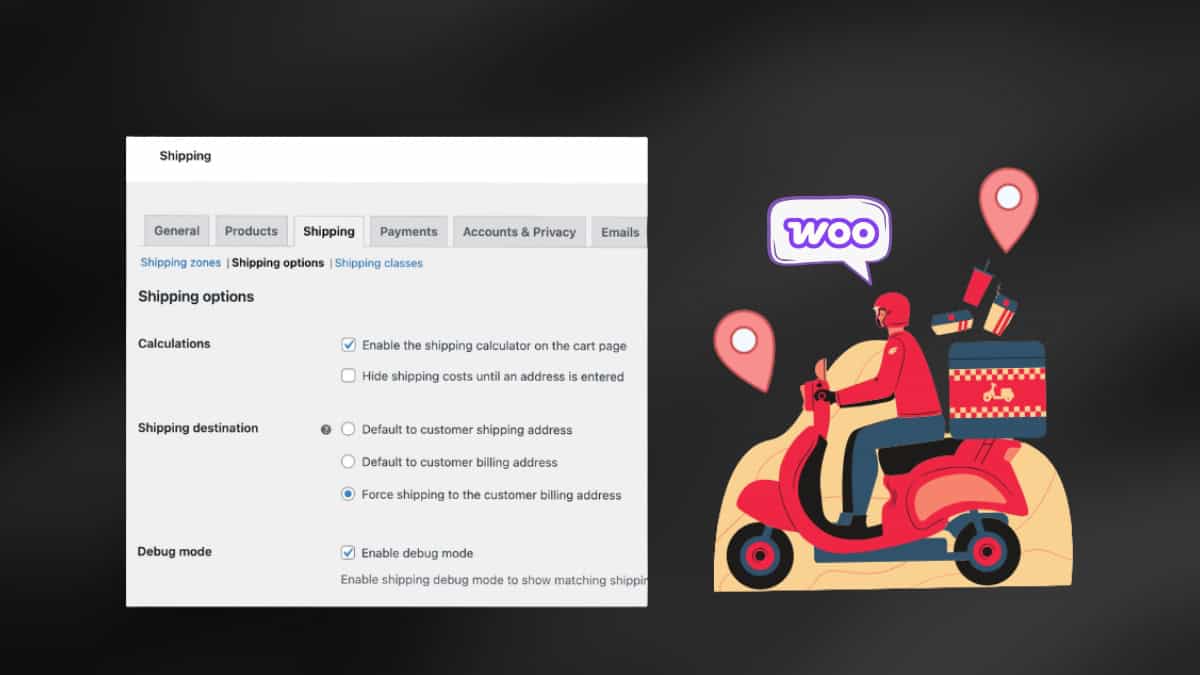
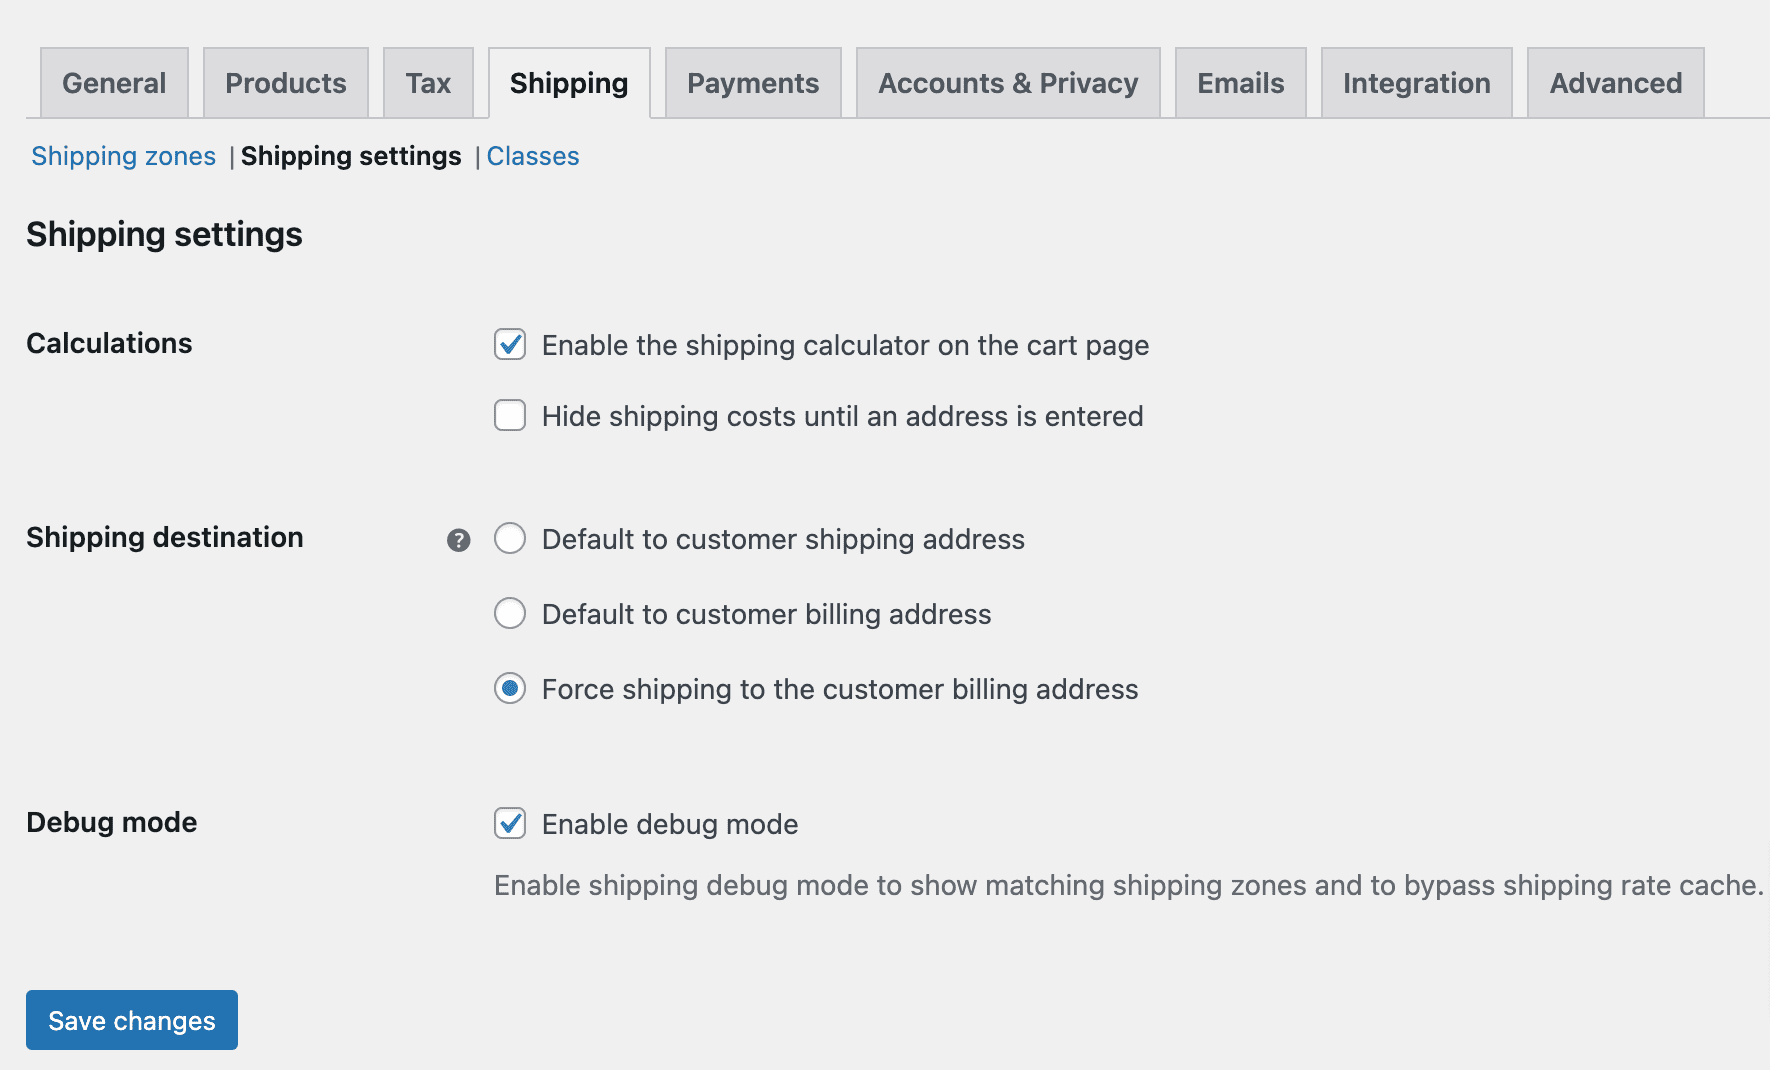
Configure Shipping Settings
This configuration enables you to customize your shipping settings.
- Calculation
- To display the shipping calculator on the cart page, select the “Enable the shipping calculator on the cart page” option.
- To hide the shipping cost until the user enters the address, enable the “Hide shipping costs until an address is entered” option.
- Shipping Destination: It determines the default shipping address that is used during the checkout process.
- To configure the customer’s shipping address as the default option, enable the “Default to customer shipping address” option.
- To configure the customer’s billing address as the default option, enable the “Default to customer billing address” option.
- By enabling the “Force shipping to customer billing address” option, you can ensure that the customer’s shipping address is automatically set to be the same as the billing address. In this scenario, no additional options will be displayed for customers to add a separate shipping address.
- Debug Mode: To debug the proper functioning of your shipping zones, you can check the “Enable Debug Mode” option.
After configuring all the settings, click on “Save Changes” button to save the settings.
Defining Shipping Classes
Shipping classes in WooCommerce allow you to group similar products together, especially those that are large or require extra care during delivery. Each product can be assigned a specific shipping class, enabling you to differentiate its shipping requirements and costs.
For example, if you offer both t-shirts and fragile home decor items made of glass, their shipping costs will differ. The delicate glass items will require special packaging and handling, resulting in additional shipping expenses.
When adding new products to your store, you can assign them a unique shipping class or group them under an existing class.
Steps to Create Shipping Class
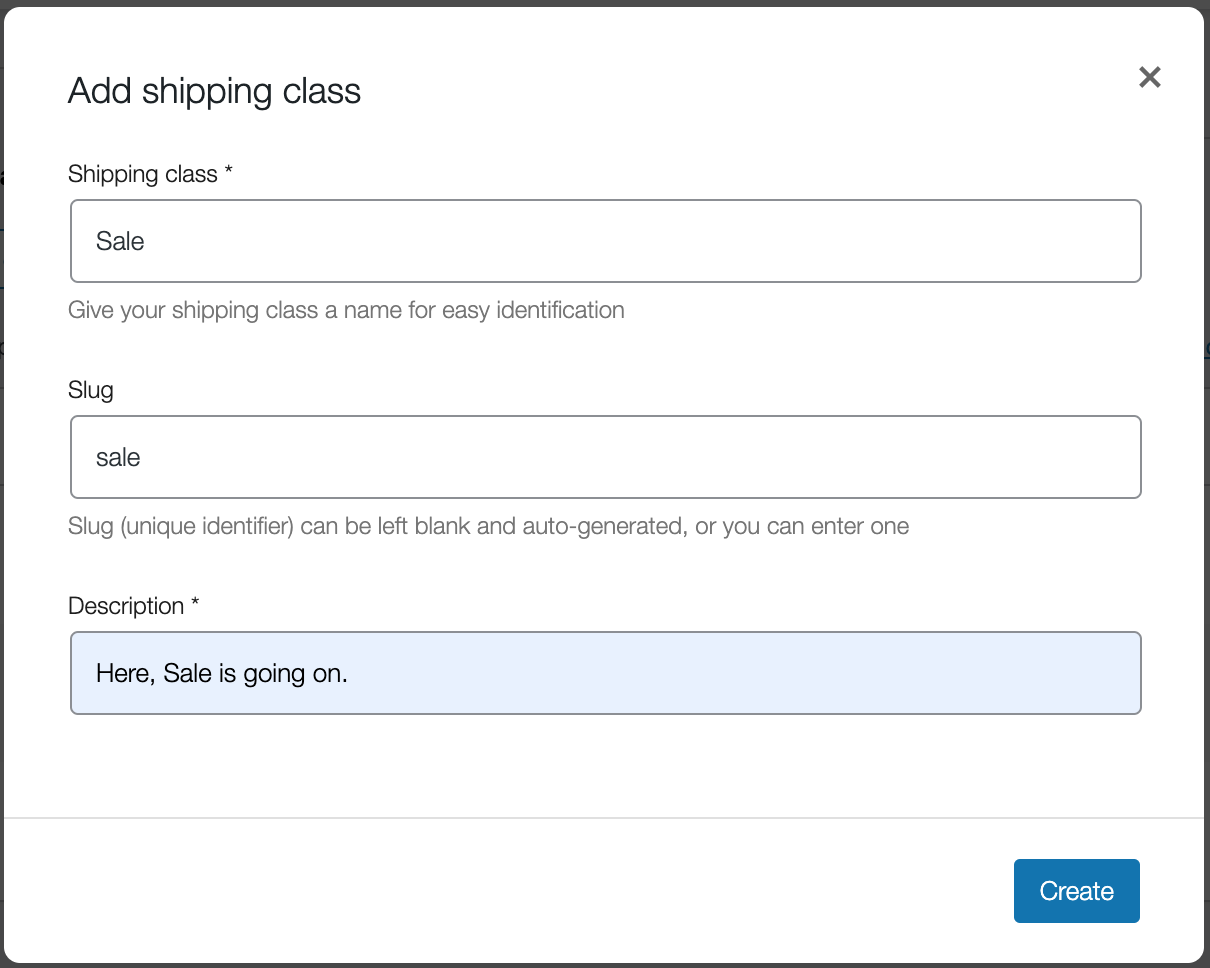
- To create a new shipping class, navigate to the Shipping tab, then click on Classes option. From there, click on the “Add shipping class” button.
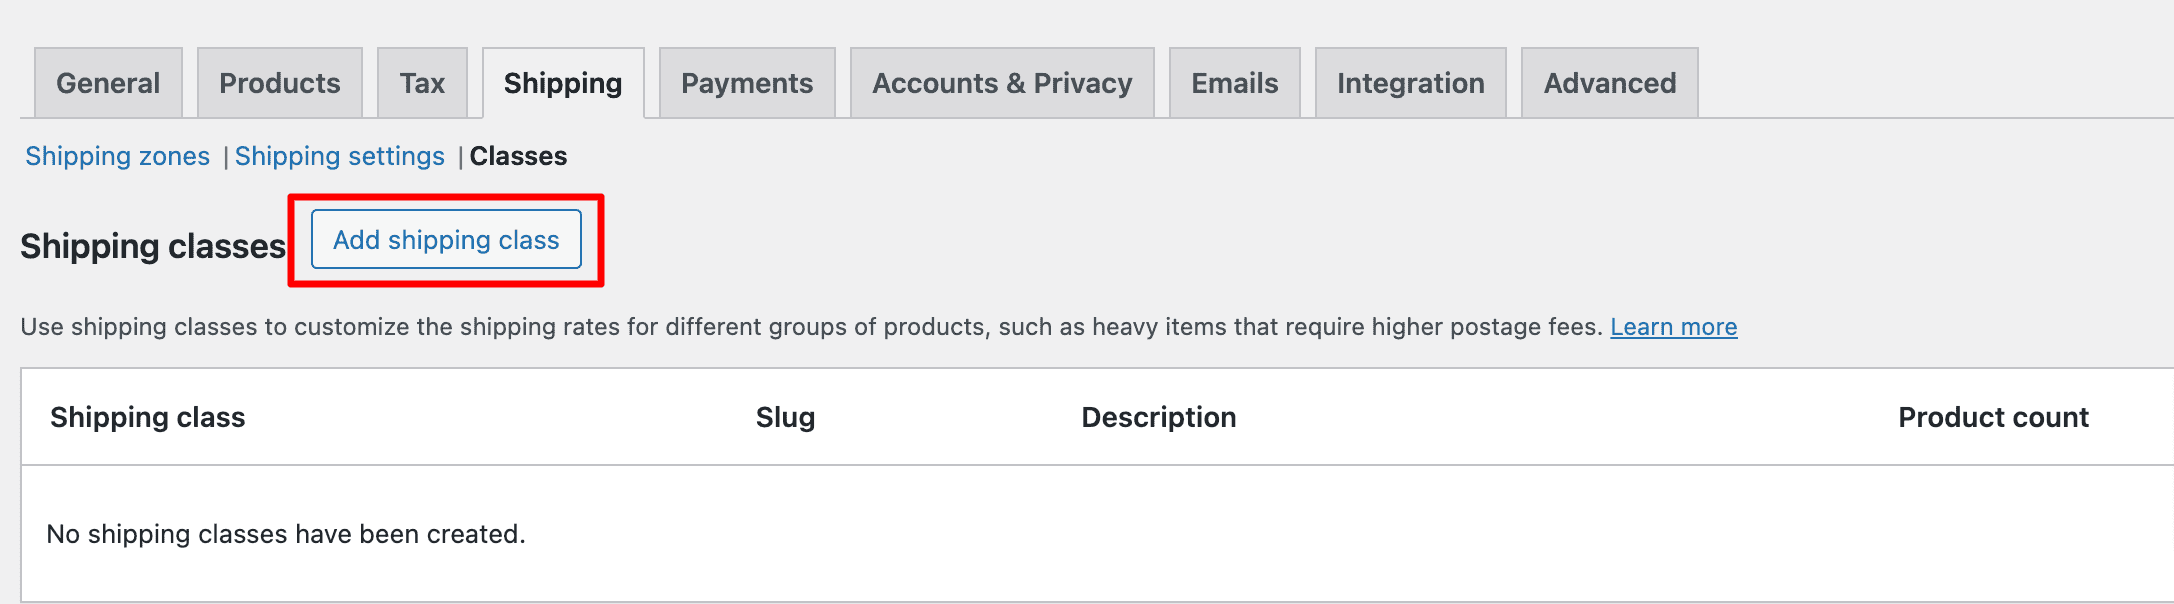
- Next, provide the name, slug, and description of the shipping class you are creating. Once you have entered the necessary details, click on the “Create” button to save the newly created class.
Save your time by utilizing the Frontend Product Editor Plugin to effortlessly assign your created WooCommerce shipping classes to products directly from the frontend.
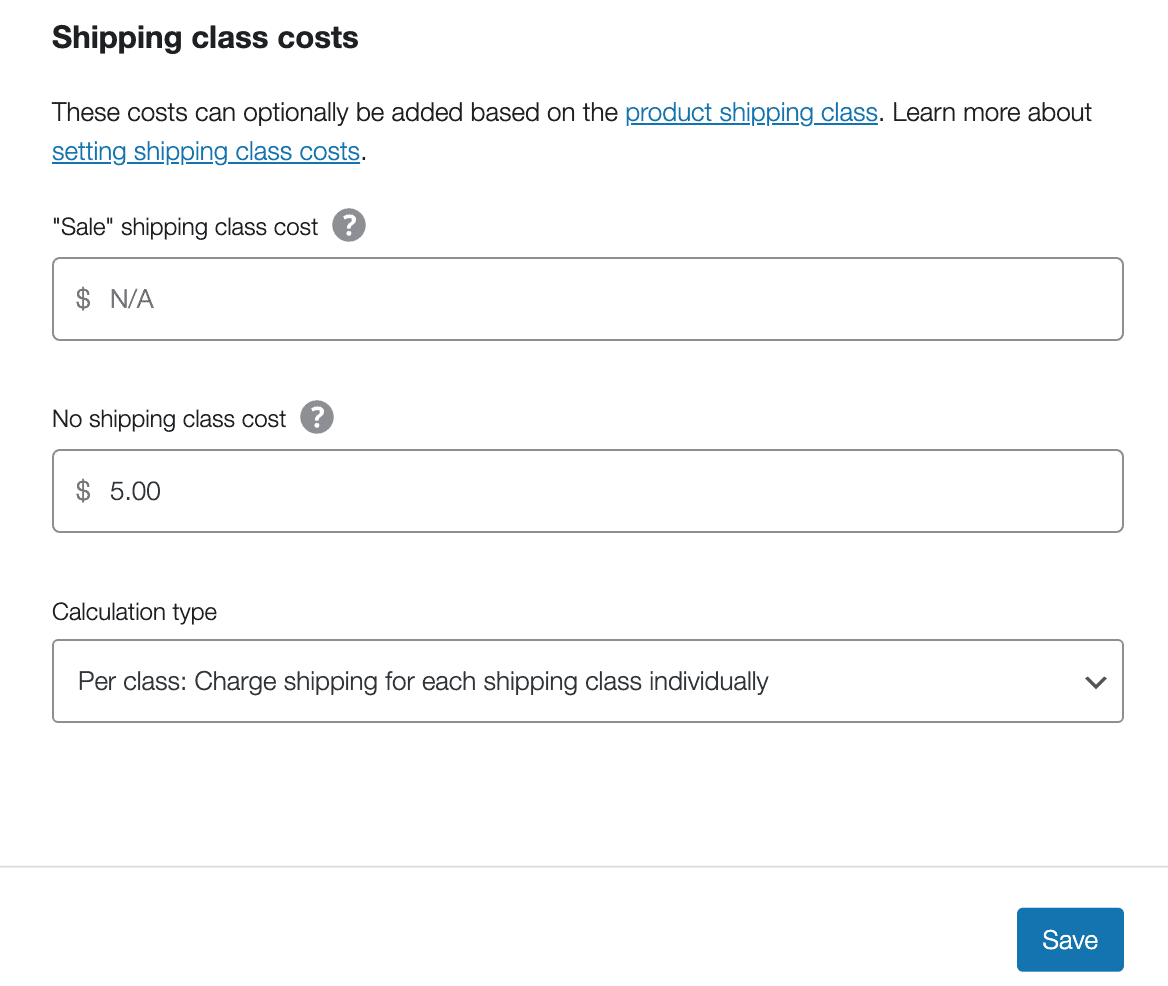
- Navigate to the “Shipping Zones” section and choose a specific zone that you want to configure. Once you have selected the desired zone, locate the “Flat Rate” shipping method and click on the “Edit” button next to it.

- After clicking on the button, an additional Shipping Class Cost Section will appear.
- In this section, you can determine the calculation type and set the shipping costs for the selected shipping class. Once you set all the details, click on “Save Changes” button.
- Calculation types come with two options:
- Per Order: This option selects the highest shipping cost from all the items in the cart. It applies the shipping cost based on the most expensive option among the items.
- Per Class: With this option, shipping costs are calculated for each shipping class individually. It charges shipping fees separately for each class, regardless of the other items in the cart.
- No Shipping Class Cost – Useful when you are selecting the “Per Class” option below. Otherwise, you can input the shipping costs directly in the “Cost” field.
Please check our detailed article to learn about WooCommerce Shipping Classes
Common WooCommerce Shipping Challenges (and How to Solve Them)
Confusion Between Shipping Zones and Shipping Classes
One of the most common mistakes is mixing up shipping zones (which are based on customer locations) with shipping classes (which group products with similar shipping requirements). This often leads to shipping rates not being applied correctly.
Shipping Class Not Affecting Shipping Costs
Creating shipping classes alone isn’t enough. Users often forget to assign these classes to specific products or fail to define the shipping costs for each class using the Flat Rate shipping method. As a result, the class has no impact on the shipping calculation.
Incorrect or Missing Class Assignment
If a product is mistakenly left under “No shipping class,” it may not follow the correct shipping rate, especially if specific rules are set for other classes.
Lack of Proper Testing
Many users set up shipping classes and assume they are working correctly without thoroughly testing different scenarios, such as various locations or product combinations. This can lead to issues that only appear when customers face them.
Set up Shipping in Your WooCommerce Store
In conclusion, setting up WooCommerce shipping doesn’t have to be a challenging task. By following the step-by-step guide provided, you can easily configure your shipping options and ensure a smooth and efficient process for delivering your products to customers. Remember to consider your business needs, choose the right shipping methods, set appropriate shipping rates, and test the entire process to make sure everything works seamlessly.
FAQs About WooCommerce Shipping
What are WooCommerce shipping zones?
Shipping zones are geographical areas (like countries, states, or zip codes) where you can define specific shipping methods and rates. For example, you can charge different rates for the US and Canada.
What is the difference between shipping zones and shipping classes in WooCommerce?
Shipping zones determine where you ship and which methods apply; shipping classes group similar products to apply specific shipping costs within those zones.
Can I set local pickup only for certain products?
Yes, create a shipping class for those products and configure Local Pickup to apply only when those items are in the cart.
What is the Rest of the World zone in WooCommerce?
This is a default fallback shipping zone that applies to locations not covered by your custom zones. You can configure it with its own shipping methods or leave it empty if you don’t ship globally.
What are shipping classes in WooCommerce?
Shipping classes let you group similar products and assign specific shipping rates to each group. For example, heavy or fragile items can be assigned a higher shipping rate than lightweight items.
What are the different shipping options available in WooCommerce?
WooCommerce offers three main built-in shipping methods: Flat Rate, Local Pickup, and Free shipping.

Leave a Reply